<?xml version="1.0" encoding="utf-8"?>
<feed xmlns="http://www.w3.org/2005/Atom">
  <title>My Coding Journey</title>
  <subtitle>Journey to a Full Stack Developer</subtitle>
  <link href="/atom.xml" rel="self"/>
  
  <link href="http://yoursite.com/"/>
  <updated>2017-12-03T14:14:56.000Z</updated>
  <id>http://yoursite.com/</id>
  
  <author>
    <name>Danny Huang</name>
    
  </author>
  
  <generator uri="http://hexo.io/">Hexo</generator>
  
  <entry>
    <title>Wordpress Theme Development - Hierarchy</title>
    <link href="http://yoursite.com/Wordpress-Theme-Development-Hierarchy.html"/>
    <id>http://yoursite.com/Wordpress-Theme-Development-Hierarchy.html</id>
    <published>2017-12-01T15:02:29.000Z</published>
    <updated>2017-12-03T14:14:56.000Z</updated>
    
    <content type="html"><![CDATA[<h2 id="Introduction"><a href="#Introduction" class="headerlink" title="Introduction"></a>Introduction</h2><p>Wordpress Hierarchy is very important for theme development in wordpress. Hierarchy determines what custom template to display during specific situations. For example we can have a custom category or a custom archive page if we want to.</p>
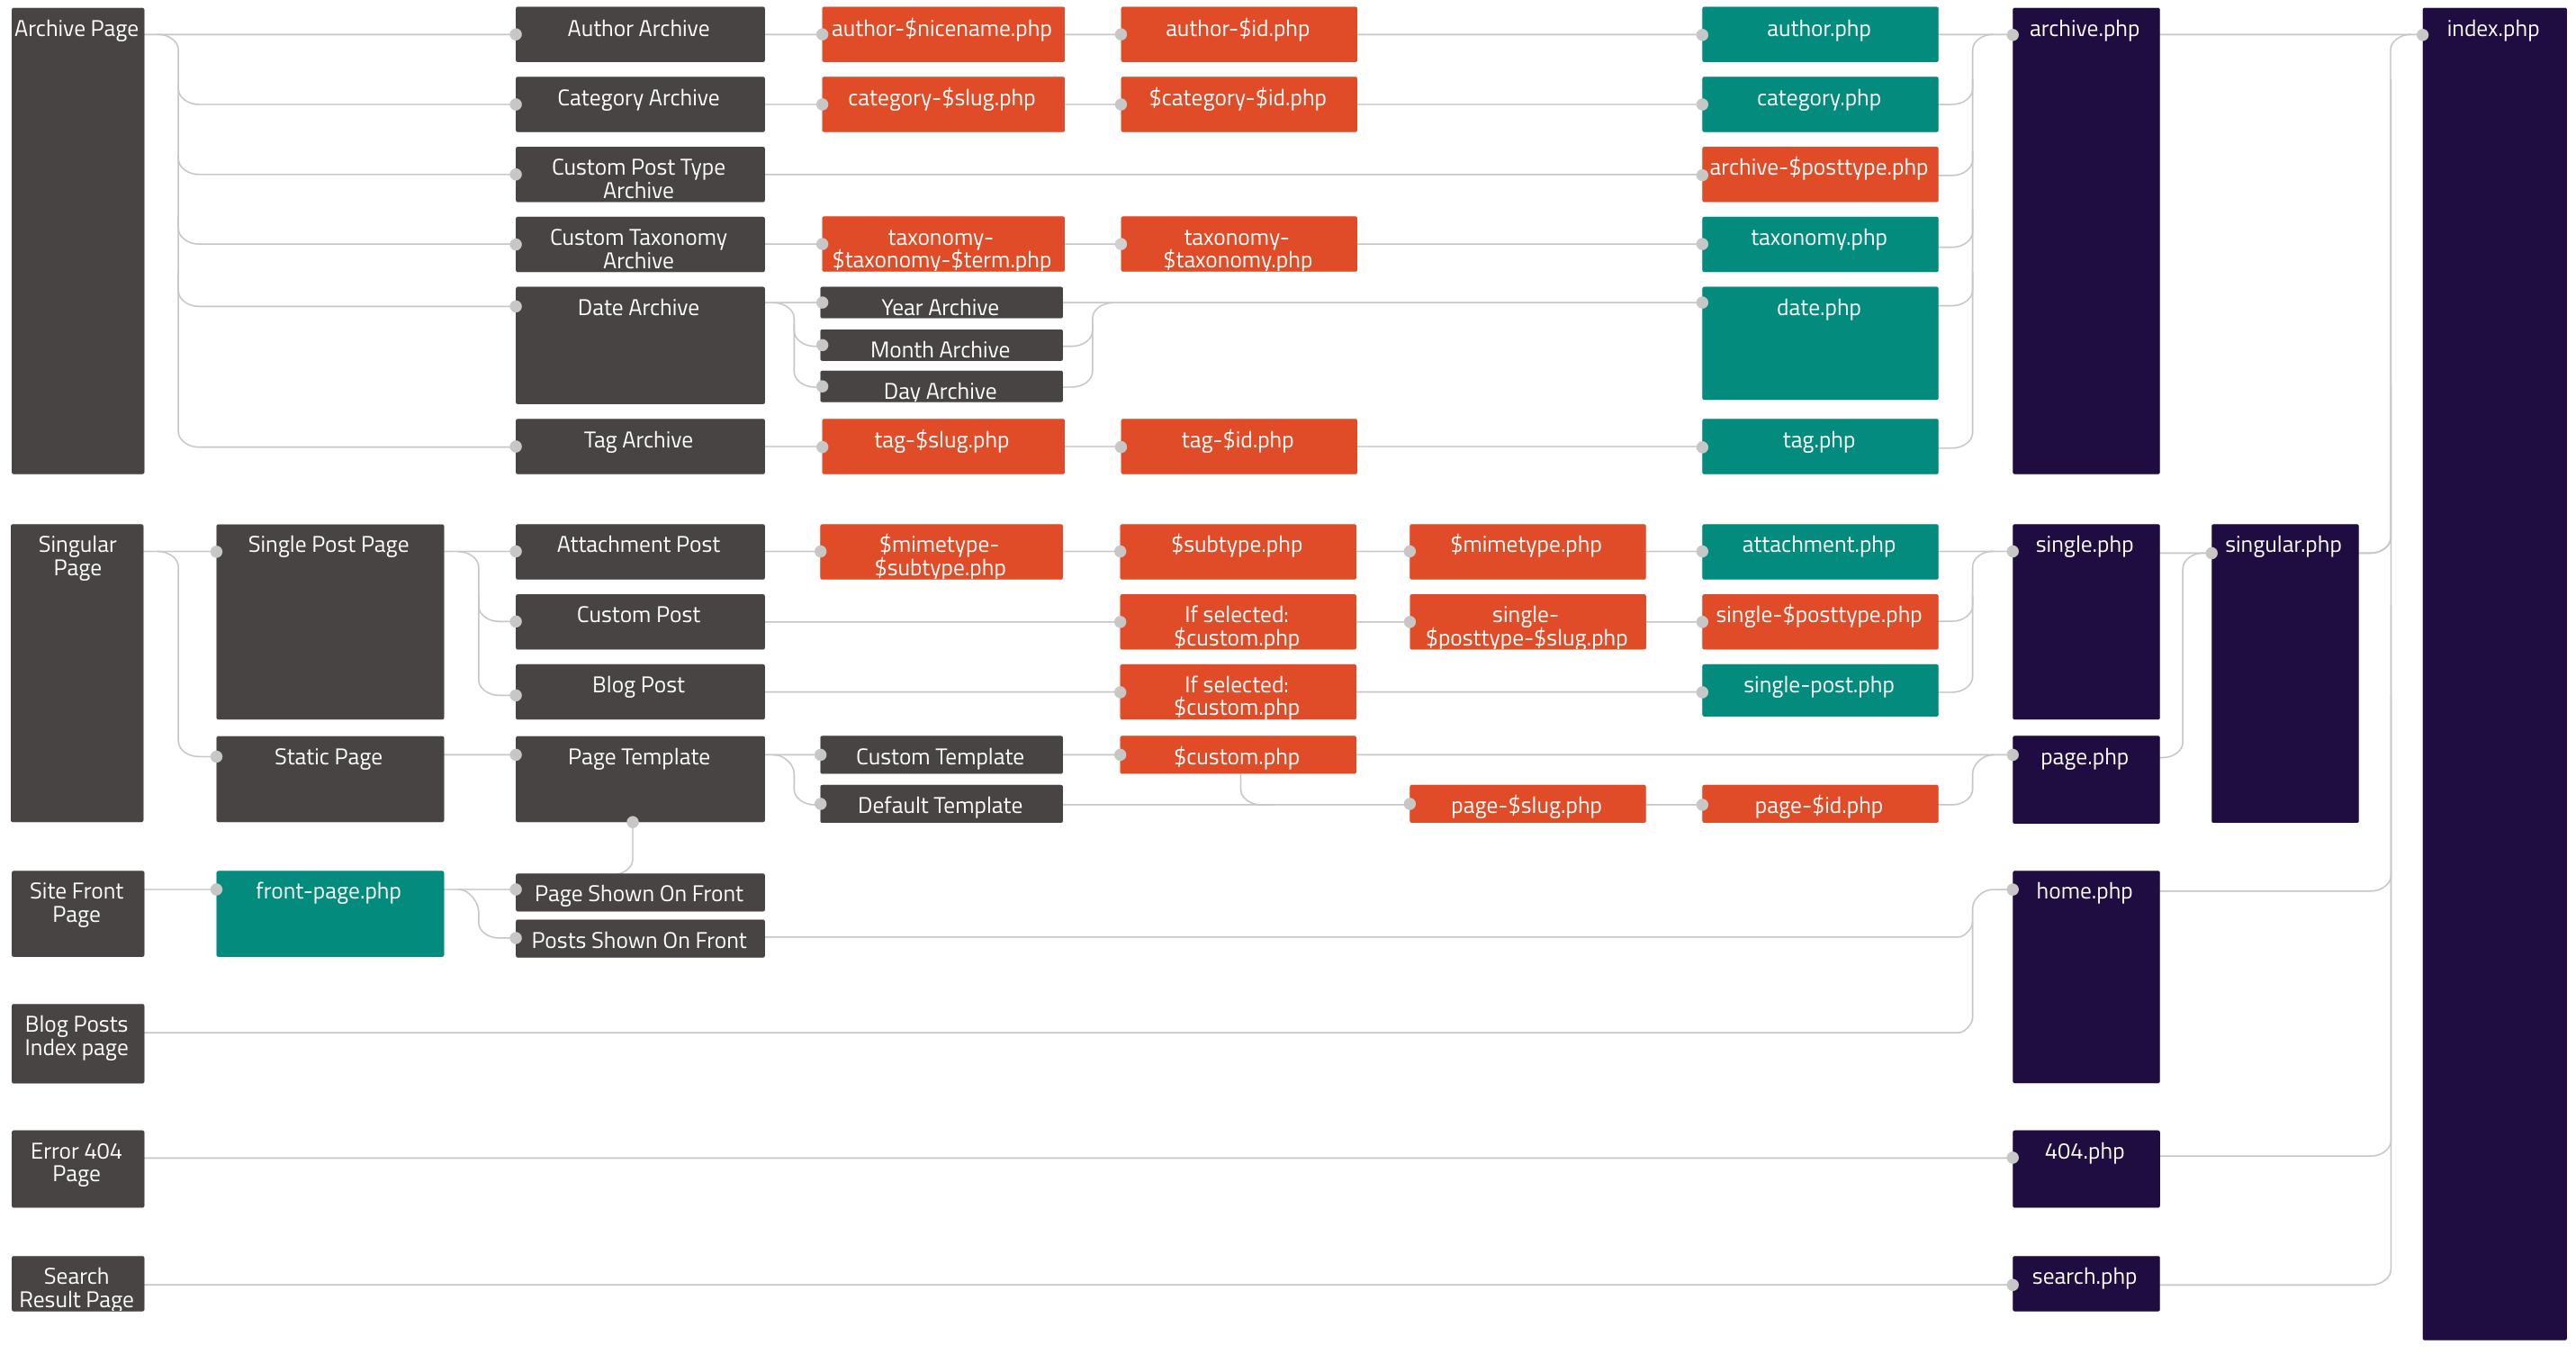
<p>Here’s a hierarchy chart that shows the ranking of the hierachy wordpress template. However, to be honest I only use couple of the custom templates.</p>
<p><img src="https://developer.wordpress.org/files/2014/10/wp-hierarchy.png" alt="WP Hierarchy" title="WP Hierarchy"></p>
<h2 id="Custom-page"><a href="#Custom-page" class="headerlink" title="Custom page"></a>Custom page</h2><p>For custom page you want to create a page-$slug.php (for example page-about.php). Then in your pages in wordpress we can select which page template we want to use for this page. I use this the most in my custom theme development.</p>
<p>Some of the other ones in the hierachy chart is pretty obvious like category.php is a custom template for category page, archive.php for archive page, single.php for single post page.</p>
<p>If you really want a specific template css for a specific category page. Then you would need to look up the chart and look at the options for category. So the ranking is category.php &gt; $category-$id.php &gt; category-$slug.php.</p>
<h2 id="Reference"><a href="#Reference" class="headerlink" title="Reference"></a>Reference</h2><ul>
<li><a href="https://developer.wordpress.org/themes/basics/template-hierarchy/" target="_blank" rel="noopener">WP hierarchy template</a></li>
<li><a href="https://wphierarchy.com/" target="_blank" rel="noopener">WP Hierarchy Visual Reference</a></li>
</ul>
]]></content>
    
    <summary type="html">
    
      &lt;h2 id=&quot;Introduction&quot;&gt;&lt;a href=&quot;#Introduction&quot; class=&quot;headerlink&quot; title=&quot;Introduction&quot;&gt;&lt;/a&gt;Introduction&lt;/h2&gt;&lt;p&gt;Wordpress Hierarchy is very im
    
    </summary>
    
    
      <category term="wordpress" scheme="http://yoursite.com/tags/wordpress/"/>
    
  </entry>
  
  <entry>
    <title>My Recommended Wordpress Plugins</title>
    <link href="http://yoursite.com/My-Recommended-Wordpress-Plugins.html"/>
    <id>http://yoursite.com/My-Recommended-Wordpress-Plugins.html</id>
    <published>2017-11-26T11:19:10.000Z</published>
    <updated>2017-11-26T11:43:58.000Z</updated>
    
    <content type="html"><![CDATA[<h2 id="Introduction"><a href="#Introduction" class="headerlink" title="Introduction"></a>Introduction</h2><p>Recently I’ve been learning wordpress theme development, and I built my first wordpress site for my client. I want to share some of the wordpress plugins that I use.</p>
<h2 id="Plugins"><a href="#Plugins" class="headerlink" title="Plugins"></a>Plugins</h2><h3 id="Custom-Post-Type-UI"><a href="#Custom-Post-Type-UI" class="headerlink" title="Custom Post Type UI"></a>Custom Post Type UI</h3><p>Provides easy interface to register and manage custom post type. I use this to create a custom post type when I need more than the original post type. The UI interface make it really easy to create and custom your post type.</p>
<h3 id="Advanced-Custom-field-ACF-link"><a href="#Advanced-Custom-field-ACF-link" class="headerlink" title="Advanced Custom field(ACF) link"></a>Advanced Custom field(ACF) <a href="https://www.advancedcustomfields.com" target="_blank" rel="noopener">link</a></h3><p>Add custom field, such as image, text, tabs to your post or page. You can add ACF to page or post. This is a great plugin and can do many CMS features with Custom Post Type UI. Wordpress has its custom field with get_post_meta API. However, it will become very messy and unscalable in the long run.</p>
<h3 id="Contact-form-7-link"><a href="#Contact-form-7-link" class="headerlink" title="Contact form 7 link"></a>Contact form 7 <a href="https://contactform7.com/" target="_blank" rel="noopener">link</a></h3><p>I use contact form 7 to build custom contact form. With it’s custom field API we can design our contact form. We can also customize our form with CSS.</p>
<h3 id="Yeost-SEO-link"><a href="#Yeost-SEO-link" class="headerlink" title="Yeost SEO link"></a>Yeost SEO <a href="https://wordpress.org/plugins/wordpress-seo/" target="_blank" rel="noopener">link</a></h3><p>Optimze your post and pages for google. It also has a preview of how your post will look in google search result. It also has recommendations for how to optimize your post for SEO.</p>
<h3 id="All-in-One-migration-link"><a href="#All-in-One-migration-link" class="headerlink" title="All in One migration link"></a>All in One migration <a href="https://wordpress.org/plugins/wordpress-seo/" target="_blank" rel="noopener">link</a></h3><p>This is the easy migrate your wordpress site from one place to another. Simply export and the plugin will compress all your wordpress site into a zip file. Then you just need to go to your hosting website and install brand new wordpress. Finally install the plugin and import the compress zip file. Then you should be good togo.</p>
<h3 id="Duplicator-link"><a href="#Duplicator-link" class="headerlink" title="Duplicator link"></a>Duplicator <a href="https://wordpress.org/plugins/duplicator/" target="_blank" rel="noopener">link</a></h3><p>This is another wordpress migration plugin. I use this plugin sometimes when WP migration doesn’t work. Duplicator is a little harder to use. But it’s still not that bad.</p>
<p>I’ll consistently update more plugins in the future when I encounter them.</p>
]]></content>
    
    <summary type="html">
    
      &lt;h2 id=&quot;Introduction&quot;&gt;&lt;a href=&quot;#Introduction&quot; class=&quot;headerlink&quot; title=&quot;Introduction&quot;&gt;&lt;/a&gt;Introduction&lt;/h2&gt;&lt;p&gt;Recently I’ve been learning wo
    
    </summary>
    
    
      <category term="wordpress" scheme="http://yoursite.com/tags/wordpress/"/>
    
  </entry>
  
  <entry>
    <title>Book Review: Once Upon Wall Street Book Review</title>
    <link href="http://yoursite.com/Once-Upon-Wall-Street-Book-Review.html"/>
    <id>http://yoursite.com/Once-Upon-Wall-Street-Book-Review.html</id>
    <published>2017-11-19T13:07:14.000Z</published>
    <updated>2017-11-26T08:08:52.000Z</updated>
    
    <content type="html"><![CDATA[<p><img src="https://images-na.ssl-images-amazon.com/images/I/51rHrFJEFxL._SY344_BO1,204,203,200_.jpg" alt="One Up On Wall Street" title="One Up On Wall Street,"></p>
<h2 id="Background"><a href="#Background" class="headerlink" title="Background"></a>Background</h2><p>Peter Lynch is an American investor and manager of Magellan Fund between1 1977 to 1990. During his period he averaged an annual return of 29.2%. In his book is describe where he gets stock ideas from everyday life and common sense. For example if you are in the auto industry, you will have more knowledge than average people in the auto industry and auto related industry (ex. steel, oil, auto-components, tires, auto-finance, and etc). Then you should look at stocks in these industries.</p>
<p>You will be able to see cyclicals turn around before other people, or spot opportunies that average people won’t see.</p>
<h2 id="6-Different-Types-of-Stock"><a href="#6-Different-Types-of-Stock" class="headerlink" title="6 Different Types of Stock"></a>6 Different Types of Stock</h2><p>Peter lynch also group stocks into 6 different main categories.</p>
<h3 id="Slow-Growers"><a href="#Slow-Growers" class="headerlink" title="Slow Growers"></a>Slow Growers</h3><p>These are usually large companies that are generally older and expected to grow slightly faster than the country’s gross national output.Lynch is not against these companies, he simply says not to expect huge returns on these companies. For example KO and GE.</p>
<h3 id="Stalwarts"><a href="#Stalwarts" class="headerlink" title="Stalwarts"></a>Stalwarts</h3><p>The stalwarts are companies that don’t do a lot of shaking during recessions and economic downturns. For example, McDonalds.</p>
<h3 id="Fast-Growers"><a href="#Fast-Growers" class="headerlink" title="Fast Growers"></a>Fast Growers</h3><p>You don’t need to have a fast growing industry to find a fast growing company. These types of investments are Lynch’s favorites, as many new, fast growing companies can turn into 10 to 40-baggers or more (in Lynch’s experience).</p>
<h3 id="Cyclicals"><a href="#Cyclicals" class="headerlink" title="Cyclicals"></a>Cyclicals</h3><p>According to Lynch a cyclical company is one ‘whose sales and profits rise and fall in regular if not completely predicable fashion.”</p>
<h3 id="Turnarounds"><a href="#Turnarounds" class="headerlink" title="Turnarounds"></a>Turnarounds</h3><p>Companies that can barely make it to the bankruptcy lawyers before completely dying are candidates for the turnaround category.</p>
<h3 id="Asset-Plays"><a href="#Asset-Plays" class="headerlink" title="Asset Plays"></a>Asset Plays</h3><p>These companies have a certain known asset that will set it apart from other companies in the future.  The asset might be cash or it might be an island full of oil off the coast of a country.  Patience is the most important aspect for investing in these companies, because it may take a while before you see any profits come from it.</p>
<h2 id="Conclusion"><a href="#Conclusion" class="headerlink" title="Conclusion"></a>Conclusion</h2><p>Overall this is a great book for beginner investors. He also mention some metrics to look at to avoid disaster. Also he focus a lot of growth. An formula he uses is (Dividend yield + Growth) / PE Ratio. Some people refers to as PEG ratio.</p>
<h2 id="Reference"><a href="#Reference" class="headerlink" title="Reference"></a>Reference</h2><ul>
<li><p><a href="https://www.stockfeel.com.tw/%E5%BD%BC%E5%BE%97%E6%9E%97%E5%8D%80%E9%81%B8%E8%82%A1-2/" target="_blank" rel="noopener">StockFeel Peter Lynch(Chinese)</a></p>
</li>
<li><p><a href="http://www.patheos.com/blogs/faithandfinance/2011/08/03/6-stock-categories-peter-lynch-uses/" target="_blank" rel="noopener">6 Stock Categories Peter Lynch Uses</a></p>
</li>
</ul>
]]></content>
    
    <summary type="html">
    
      &lt;p&gt;&lt;img src=&quot;https://images-na.ssl-images-amazon.com/images/I/51rHrFJEFxL._SY344_BO1,204,203,200_.jpg&quot; alt=&quot;One Up On Wall Street&quot; title=&quot;On
    
    </summary>
    
    
      <category term="Book Review" scheme="http://yoursite.com/tags/Book-Review/"/>
    
  </entry>
  
  <entry>
    <title>Wordpress htaccess setup</title>
    <link href="http://yoursite.com/Wordpress-htaccess-setup.html"/>
    <id>http://yoursite.com/Wordpress-htaccess-setup.html</id>
    <published>2017-11-19T11:46:20.000Z</published>
    <updated>2017-11-19T13:06:34.000Z</updated>
    
    <content type="html"><![CDATA[<h2 id="What-is-htaccess"><a href="#What-is-htaccess" class="headerlink" title="What is htaccess"></a>What is htaccess</h2><p>Htaccess is a file that config apache server. We can make our website more secure and faster. These facilities include basic redirect functionality, for instance if a 404 file not found error occurs, or for more advanced functions such as content password protection or image hot link prevention.</p>
<p>You can google htaccess configuration online and you will find plenty of them. Below I’ll show my configutation.</p>
<h2 id="Find-your-htaccess"><a href="#Find-your-htaccess" class="headerlink" title="Find your htaccess"></a>Find your htaccess</h2><p>In your cpanel dashboard, go to file directory. However, hidden files will not be displayed. In order to do that, we go to our URL and add showhidden=1. This configuration will display our htaccess.</p>
<h2 id="Setup-code-snippets"><a href="#Setup-code-snippets" class="headerlink" title="Setup code snippets"></a>Setup code snippets</h2><p>Here are some code snippets that I use for my wordpress site.</p>
<ol>
<li><p>This prevents anyone to visit wp-config</p>
<figure class="highlight plain"><table><tr><td class="gutter"><pre><span class="line">1</span><br><span class="line">2</span><br><span class="line">3</span><br><span class="line">4</span><br></pre></td><td class="code"><pre><span class="line">&lt;files wp-config.php&gt;</span><br><span class="line">order allow,deny</span><br><span class="line">deny from all</span><br><span class="line">&lt;/files&gt;</span><br></pre></td></tr></table></figure>
</li>
<li><p>Prevent Directory Browsing</p>
<figure class="highlight plain"><table><tr><td class="gutter"><pre><span class="line">1</span><br><span class="line">2</span><br></pre></td><td class="code"><pre><span class="line"># disable directory browsing</span><br><span class="line">Options All -Indexes</span><br></pre></td></tr></table></figure>
</li>
<li><p>Enable Browser Cache. Basically if the image remains unchanged, then it will be stored on client’s browser and will not need to reload. This will improve the user experience.</p>
<figure class="highlight plain"><table><tr><td class="gutter"><pre><span class="line">1</span><br><span class="line">2</span><br><span class="line">3</span><br><span class="line">4</span><br><span class="line">5</span><br><span class="line">6</span><br><span class="line">7</span><br><span class="line">8</span><br><span class="line">9</span><br><span class="line">10</span><br><span class="line">11</span><br><span class="line">12</span><br><span class="line">13</span><br><span class="line">14</span><br><span class="line">15</span><br></pre></td><td class="code"><pre><span class="line">## EXPIRES CACHING ##</span><br><span class="line">&lt;IfModule mod_expires.c&gt;</span><br><span class="line">ExpiresActive On</span><br><span class="line">ExpiresByType image/jpg &quot;access 1 year&quot;</span><br><span class="line">ExpiresByType image/jpeg &quot;access 1 year&quot;</span><br><span class="line">ExpiresByType image/gif &quot;access 1 year&quot;</span><br><span class="line">ExpiresByType image/png &quot;access 1 year&quot;</span><br><span class="line">ExpiresByType text/css &quot;access 1 month&quot;</span><br><span class="line">ExpiresByType application/pdf &quot;access 1 month&quot;</span><br><span class="line">ExpiresByType text/x-javascript &quot;access 1 month&quot;</span><br><span class="line">ExpiresByType application/x-shockwave-flash &quot;access 1 month&quot;</span><br><span class="line">ExpiresByType image/x-icon &quot;access 1 year&quot;</span><br><span class="line">ExpiresDefault &quot;access 2 days&quot;</span><br><span class="line">&lt;/IfModule&gt;</span><br><span class="line">## EXPIRES CACHING ##</span><br></pre></td></tr></table></figure>
</li>
<li><p>No Hot linking to your images. Outside can not link to your images. This will reduce exccess traffic.</p>
<figure class="highlight plain"><table><tr><td class="gutter"><pre><span class="line">1</span><br><span class="line">2</span><br><span class="line">3</span><br><span class="line">4</span><br><span class="line">5</span><br></pre></td><td class="code"><pre><span class="line">RewriteEngine on</span><br><span class="line">RewriteCond %&#123;HTTP_REFERER&#125; !^$</span><br><span class="line">RewriteCond %&#123;HTTP_REFERER&#125; !^http(s)?://(www\.)?yourwebsite.com [NC]</span><br><span class="line">RewriteCond %&#123;HTTP_REFERER&#125; !^http(s)?://(www\.)?yourotherwebsite.com [NC]</span><br><span class="line">RewriteRule \.(jpg|jpeg|png|gif)$ http://i.imgur.com/g7ptdBB.png [NC,R,L]</span><br></pre></td></tr></table></figure>
</li>
</ol>
<h2 id="References"><a href="#References" class="headerlink" title="References"></a>References</h2><ul>
<li><a href="https://www.elegantthemes.com/blog/tips-tricks/wordpress-htaccess-tips-and-tricks" target="_blank" rel="noopener">WordPress Htaccess Tips And Tricks</a></li>
<li><a href="http://www.htaccess-guide.com/" target="_blank" rel="noopener">htaccess guide</a></li>
</ul>
]]></content>
    
    <summary type="html">
    
      &lt;h2 id=&quot;What-is-htaccess&quot;&gt;&lt;a href=&quot;#What-is-htaccess&quot; class=&quot;headerlink&quot; title=&quot;What is htaccess&quot;&gt;&lt;/a&gt;What is htaccess&lt;/h2&gt;&lt;p&gt;Htaccess is a 
    
    </summary>
    
    
      <category term="wordpress" scheme="http://yoursite.com/tags/wordpress/"/>
    
  </entry>
  
  <entry>
    <title>Intro to React Router</title>
    <link href="http://yoursite.com/Intro-to-React-Router.html"/>
    <id>http://yoursite.com/Intro-to-React-Router.html</id>
    <published>2017-11-11T00:02:54.000Z</published>
    <updated>2017-11-12T14:23:54.000Z</updated>
    
    <content type="html"><![CDATA[<h2 id="Introduction"><a href="#Introduction" class="headerlink" title="Introduction"></a>Introduction</h2><p>React-Router is a routing library for react js. This is important if you want to build single page application.</p>
<p>The reason that you want routing to be on the frontend is mainly for user experience. It reduce the loading time because the web app has been initally loaded in the beginning.</p>
<p>A good example of this is the angular 4 website. <a href="https://angular.io/" target="_blank" rel="noopener">(link)</a> You will notice that the website doesn’t load. (hint: you can see the refresh bottom doesn’t change)</p>
<p>Front end routing has pros and cons. The pros are great for user experience so that the web app performs like native apps. The cons are that your web app is not SEO friendly. Some SEO crawler does not read javasript well.</p>
<h2 id="How-to-use-it"><a href="#How-to-use-it" class="headerlink" title="How to use it"></a>How to use it</h2><ol>
<li><p>Create a App.js(some use route.js)</p>
</li>
<li><p>import router related components &amp;  our Components</p>
<figure class="highlight javascript"><table><tr><td class="gutter"><pre><span class="line">1</span><br><span class="line">2</span><br><span class="line">3</span><br><span class="line">4</span><br><span class="line">5</span><br><span class="line">6</span><br><span class="line">7</span><br><span class="line">8</span><br><span class="line">9</span><br><span class="line">10</span><br><span class="line">11</span><br><span class="line">12</span><br><span class="line">13</span><br></pre></td><td class="code"><pre><span class="line"><span class="comment">// import router related components</span></span><br><span class="line"><span class="keyword">import</span> &#123;</span><br><span class="line">  BrowserRouter <span class="keyword">as</span> Router,</span><br><span class="line">  Route,</span><br><span class="line">  Switch,</span><br><span class="line">&#125; <span class="keyword">from</span> <span class="string">'react-router-dom'</span></span><br><span class="line"></span><br><span class="line"><span class="comment">// import our components</span></span><br><span class="line"><span class="keyword">import</span> Nav <span class="keyword">from</span> <span class="string">'containers/Nav/Nav'</span></span><br><span class="line"><span class="keyword">import</span> MovieList <span class="keyword">from</span> <span class="string">'containers/MovieList/MovieList'</span></span><br><span class="line"><span class="keyword">import</span> MovieShow <span class="keyword">from</span> <span class="string">'containers/MovieShow/MovieShow'</span></span><br><span class="line"><span class="keyword">import</span> NotFound <span class="keyword">from</span> <span class="string">'components/NotFound/NotFound'</span>;</span><br><span class="line"><span class="keyword">import</span> Footer <span class="keyword">from</span> <span class="string">'components/Footer/Footer'</span>;</span><br></pre></td></tr></table></figure>
</li>
<li><p>Set up our routes</p>
<figure class="highlight javascript"><table><tr><td class="gutter"><pre><span class="line">1</span><br><span class="line">2</span><br><span class="line">3</span><br><span class="line">4</span><br><span class="line">5</span><br><span class="line">6</span><br><span class="line">7</span><br><span class="line">8</span><br><span class="line">9</span><br><span class="line">10</span><br><span class="line">11</span><br><span class="line">12</span><br><span class="line">13</span><br><span class="line">14</span><br><span class="line">15</span><br><span class="line">16</span><br><span class="line">17</span><br></pre></td><td class="code"><pre><span class="line"><span class="class"><span class="keyword">class</span> <span class="title">App</span> <span class="keyword">extends</span> <span class="title">Component</span> </span>&#123;</span><br><span class="line">  render() &#123;</span><br><span class="line">    <span class="keyword">return</span> (</span><br><span class="line">      &lt;Router&gt;</span><br><span class="line">      &lt;div&gt;</span><br><span class="line">        &lt;Nav /&gt;</span><br><span class="line">        &lt;Switch&gt;</span><br><span class="line">        &lt;Route exact path=<span class="string">"/"</span> component=&#123;MovieList&#125;/&gt;</span><br><span class="line">        &lt;Route path=<span class="string">"/movie/:id"</span> component=&#123;MovieShow&#125;/&gt;</span><br><span class="line">        &lt;Route component=&#123;NotFound&#125;/&gt;</span><br><span class="line">        &lt;<span class="regexp">/Switch&gt;</span></span><br><span class="line"><span class="regexp">        &lt;Footer /</span>&gt;</span><br><span class="line">      &lt;<span class="regexp">/div&gt;</span></span><br><span class="line"><span class="regexp">      &lt;/</span>Router&gt;</span><br><span class="line">    );</span><br><span class="line">  &#125;</span><br><span class="line">&#125;</span><br></pre></td></tr></table></figure>
</li>
<li><p>import to our index.js</p>
<figure class="highlight javascript"><table><tr><td class="gutter"><pre><span class="line">1</span><br><span class="line">2</span><br><span class="line">3</span><br><span class="line">4</span><br><span class="line">5</span><br><span class="line">6</span><br><span class="line">7</span><br><span class="line">8</span><br><span class="line">9</span><br></pre></td><td class="code"><pre><span class="line"><span class="keyword">import</span> App <span class="keyword">from</span> <span class="string">'./App'</span>;</span><br><span class="line"></span><br><span class="line">...</span><br><span class="line">ReactDOM.render(</span><br><span class="line">  &lt;Provider store=&#123;store&#125;&gt;</span><br><span class="line">    &lt;App /&gt;</span><br><span class="line">  &lt;<span class="regexp">/Provider&gt;,</span></span><br><span class="line"><span class="regexp">  document.getElementById('root')</span></span><br><span class="line"><span class="regexp">);</span></span><br></pre></td></tr></table></figure>
</li>
</ol>
<p>** Some important notes</p>
<ul>
<li><p>We link our routes with the component that it refers to. For example the route “/movie/:id” is link to the MovieShow component.</p>
</li>
<li><p>exact means that the path must be exactly or it will load anything with “/“</p>
</li>
<li><p><switch> is unique in that it renders a route exclusively. There’s more desciption on react router api. <a href="https://reacttraining.com/react-router/web/api/Switch" target="_blank" rel="noopener">Link</a></switch></p>
</li>
</ul>
<h2 id="References"><a href="#References" class="headerlink" title="References"></a>References</h2><ul>
<li><a href="https://github.com/kuanhsuh/netflix-clonev2" target="_blank" rel="noopener">Sample Code from my netflix-clone app</a></li>
<li><a href="https://medium.com/@pshrmn/a-simple-react-router-v4-tutorial-7f23ff27adf" target="_blank" rel="noopener">A simple react router v4 tutorial</a></li>
<li><a href="https://medium.freecodecamp.org/beginner-s-guide-to-react-router-53094349669" target="_blank" rel="noopener">Beginner’s Guide to React Router</a></li>
<li><a href="https://reacttraining.com/react-router" target="_blank" rel="noopener">React Router Offical Doc</a></li>
</ul>
]]></content>
    
    <summary type="html">
    
      &lt;h2 id=&quot;Introduction&quot;&gt;&lt;a href=&quot;#Introduction&quot; class=&quot;headerlink&quot; title=&quot;Introduction&quot;&gt;&lt;/a&gt;Introduction&lt;/h2&gt;&lt;p&gt;React-Router is a routing libr
    
    </summary>
    
    
      <category term="react" scheme="http://yoursite.com/tags/react/"/>
    
  </entry>
  
  <entry>
    <title>Redux Dev Tools + Tips, Redux Series III</title>
    <link href="http://yoursite.com/Redux-Dev-Tools-Tips-Redux-Series-III.html"/>
    <id>http://yoursite.com/Redux-Dev-Tools-Tips-Redux-Series-III.html</id>
    <published>2017-10-07T07:05:43.000Z</published>
    <updated>2017-10-08T00:26:28.000Z</updated>
    
    <content type="html"><![CDATA[<h2 id="Introduction"><a href="#Introduction" class="headerlink" title="Introduction"></a>Introduction</h2><p>You want to use dev tool because it’s great for debugging. It will track your state and action at all times. First, you want to install Chrome Redux Dev tool. <a href="https://chrome.google.com/webstore/detail/redux-devtools/lmhkpmbekcpmknklioeibfkpmmfibljd?hl=zh-TW" target="_blank" rel="noopener">Chrome Link</a></p>
<h2 id="Setup"><a href="#Setup" class="headerlink" title="Setup"></a>Setup</h2><p>Then you want to setup your dev tool in your app. So we can view it only in develop mode not in production.</p>
<p>Here’s my setup for redux dev tool. Since I have middleware, I have to set it up a little differently. For different setup you can view it here. <a href="https://github.com/kuanhsuh/netflix-clonev2/blob/master/src/index.js" target="_blank" rel="noopener">Link</a></p>
<figure class="highlight js"><table><tr><td class="gutter"><pre><span class="line">1</span><br><span class="line">2</span><br><span class="line">3</span><br><span class="line">4</span><br><span class="line">5</span><br></pre></td><td class="code"><pre><span class="line"><span class="comment">//index.js</span></span><br><span class="line"><span class="keyword">const</span> composeEnhancers = <span class="built_in">window</span>.__REDUX_DEVTOOLS_EXTENSION_COMPOSE__ || compose;</span><br><span class="line"><span class="keyword">const</span> store = createStore(reducers, <span class="comment">/* preloadedState, */</span> composeEnhancers(</span><br><span class="line">    applyMiddleware(promise)</span><br><span class="line">));</span><br></pre></td></tr></table></figure>
<h2 id="How-to-use-it"><a href="#How-to-use-it" class="headerlink" title="How to use it."></a>How to use it.</h2><p>When you dispatch an action, you can check out the process in the dev tool. You can track action and state. With this tool you can properly see if the state has changed.</p>


<h2 id="Tip-1-How-to-use-local-storage-with-Redux-Store"><a href="#Tip-1-How-to-use-local-storage-with-Redux-Store" class="headerlink" title="Tip # 1 How to use local storage with Redux Store."></a>Tip # 1 How to use local storage with Redux Store.</h2><p>Here’s another tip, I want to share. Here’s how to setup localstorage with redux.</p>
<figure class="highlight js"><table><tr><td class="gutter"><pre><span class="line">1</span><br><span class="line">2</span><br><span class="line">3</span><br><span class="line">4</span><br><span class="line">5</span><br><span class="line">6</span><br><span class="line">7</span><br></pre></td><td class="code"><pre><span class="line"><span class="comment">//index.js</span></span><br><span class="line"><span class="keyword">const</span> persistedState = localStorage.getItem(<span class="string">' _username_recipes'</span>) ? <span class="built_in">JSON</span>.parse(localStorage.getItem(<span class="string">' _username_recipes'</span>)) : &#123;&#125;</span><br><span class="line"></span><br><span class="line"><span class="keyword">const</span> store = createStore(reducer, persistedState);</span><br><span class="line">store.subscribe(<span class="function"><span class="params">()</span>=&gt;</span>&#123;</span><br><span class="line">  localStorage.setItem(<span class="string">' _username_recipes'</span>, <span class="built_in">JSON</span>.stringify(store.getState()))</span><br><span class="line">&#125;)</span><br></pre></td></tr></table></figure>
<h2 id="Links"><a href="#Links" class="headerlink" title="Links"></a>Links</h2><ul>
<li><a href="https://github.com/kuanhsuh/ReactJS-FCC_Recipe_Box/blob/master/src/index.js" target="_blank" rel="noopener">Redux with local storage</a></li>
<li>[Redux Dev tool Doc](<a href="https://github.com/zalmoxisus/redux-devtools-extension" target="_blank" rel="noopener">https://github.com/zalmoxisus/redux-devtools-extension</a></li>
<li><a href="https://github.com/kuanhsuh/netflix-clonev2/blob/master/src/index.js" target="_blank" rel="noopener">My Netflix app with redux dev tool</a></li>
</ul>
]]></content>
    
    <summary type="html">
    
      &lt;h2 id=&quot;Introduction&quot;&gt;&lt;a href=&quot;#Introduction&quot; class=&quot;headerlink&quot; title=&quot;Introduction&quot;&gt;&lt;/a&gt;Introduction&lt;/h2&gt;&lt;p&gt;You want to use dev tool becau
    
    </summary>
    
    
      <category term="react" scheme="http://yoursite.com/tags/react/"/>
    
      <category term="redux" scheme="http://yoursite.com/tags/redux/"/>
    
  </entry>
  
  <entry>
    <title>Redux with React, Redux Series II</title>
    <link href="http://yoursite.com/Redux-with-React-Redux-Series-II.html"/>
    <id>http://yoursite.com/Redux-with-React-Redux-Series-II.html</id>
    <published>2017-10-07T00:50:39.000Z</published>
    <updated>2017-10-08T00:26:56.000Z</updated>
    
    <content type="html"><![CDATA[<p><img src="https://raw.githubusercontent.com/reactjs/redux/master/logo/logo-title-dark.png" alt="Redux Logo" title="Redux Logo"></p>
<h2 id="Background"><a href="#Background" class="headerlink" title="Background"></a>Background</h2><p>First we must separate our react component into two different types, and they are container and components. Containers are components that interacts with redux. They handle the data and state management. Sometimes they are refer to as “smart component”. Components are sometimes refer to as “dumb components”. They only deal with markup and styles. They receive props from containers and display the data.</p>
<h2 id="Setup"><a href="#Setup" class="headerlink" title="Setup"></a>Setup</h2><p>I’m going to show you the following steps with my recipe app. You can view demo here or view source code here.<a href="https://github.com/kuanhsuh/ReactJS-FCC_Recipe_Box" target="_blank" rel="noopener">Recipebox Github</a></p>
<ol>
<li>First we must install redux-react</li>
</ol>
<figure class="highlight bash"><table><tr><td class="gutter"><pre><span class="line">1</span><br></pre></td><td class="code"><pre><span class="line">npm install redux react</span><br></pre></td></tr></table></figure>
<ol>
<li>Next we connect our redux with react in our index.js (where we do all the exporting)</li>
</ol>
<figure class="highlight js"><table><tr><td class="gutter"><pre><span class="line">1</span><br><span class="line">2</span><br><span class="line">3</span><br><span class="line">4</span><br><span class="line">5</span><br><span class="line">6</span><br><span class="line">7</span><br><span class="line">8</span><br><span class="line">9</span><br><span class="line">10</span><br><span class="line">11</span><br><span class="line">12</span><br><span class="line">13</span><br></pre></td><td class="code"><pre><span class="line"><span class="comment">//index.js</span></span><br><span class="line"><span class="keyword">import</span> &#123; createStore &#125; <span class="keyword">from</span> <span class="string">'redux'</span>;</span><br><span class="line"><span class="keyword">import</span> reducer <span class="keyword">from</span> <span class="string">'./reducers'</span>;</span><br><span class="line"><span class="keyword">import</span> &#123; Provider &#125; <span class="keyword">from</span> <span class="string">'react-redux'</span>;</span><br><span class="line">...</span><br><span class="line"><span class="keyword">const</span> store = createStore(reducer);</span><br><span class="line">...</span><br><span class="line">ReactDOM.render(</span><br><span class="line">  &lt;Provider store=&#123;store&#125;&gt;</span><br><span class="line">  &lt;App /&gt;</span><br><span class="line">  &lt;<span class="regexp">/Provider&gt;,</span></span><br><span class="line"><span class="regexp">  document.getElementById('root')</span></span><br><span class="line"><span class="regexp">);</span></span><br></pre></td></tr></table></figure>
<ol>
<li>Now we go to our container which is App.js and import the following modules and we connect mapStateToProps and mapDispatchToProps to our App.</li>
</ol>
<figure class="highlight js"><table><tr><td class="gutter"><pre><span class="line">1</span><br><span class="line">2</span><br><span class="line">3</span><br><span class="line">4</span><br><span class="line">5</span><br><span class="line">6</span><br><span class="line">7</span><br><span class="line">8</span><br><span class="line">9</span><br><span class="line">10</span><br><span class="line">11</span><br><span class="line">12</span><br><span class="line">13</span><br><span class="line">14</span><br><span class="line">15</span><br><span class="line">16</span><br></pre></td><td class="code"><pre><span class="line"><span class="comment">// App.js</span></span><br><span class="line"><span class="keyword">import</span> &#123; connect &#125; <span class="keyword">from</span> <span class="string">'react-redux'</span>;</span><br><span class="line"><span class="keyword">import</span> &#123; bindActionCreators &#125; <span class="keyword">from</span> <span class="string">'redux'</span>;</span><br><span class="line"><span class="keyword">import</span> * <span class="keyword">as</span> RecipeActions <span class="keyword">from</span> <span class="string">'../actions/index'</span>;</span><br><span class="line">...</span><br><span class="line"><span class="keyword">const</span> mapDispatchToProps = <span class="function"><span class="params">dispatch</span> =&gt;</span> (&#123;</span><br><span class="line">  actions: bindActionCreators(RecipeActions, dispatch)</span><br><span class="line">&#125;)</span><br><span class="line"></span><br><span class="line"><span class="keyword">const</span> mapStateToProps = <span class="function">(<span class="params">state</span>) =&gt;</span> &#123;</span><br><span class="line">  <span class="keyword">return</span> &#123;</span><br><span class="line">    recipes: state.recipes</span><br><span class="line">  &#125;</span><br><span class="line">&#125;;</span><br><span class="line">...</span><br><span class="line">connect connect(mapStateToProps, mapDispatchToProps)(App);</span><br></pre></td></tr></table></figure>
<ol>
<li>If you do the above step correctly, now we get actions and state as our props. We can test by using console.log.</li>
</ol>
<figure class="highlight js"><table><tr><td class="gutter"><pre><span class="line">1</span><br><span class="line">2</span><br><span class="line">3</span><br></pre></td><td class="code"><pre><span class="line"><span class="comment">// App.js</span></span><br><span class="line">    <span class="comment">// console.log(this.props)</span></span><br><span class="line">    <span class="keyword">const</span> &#123;actions, recipes&#125; = <span class="keyword">this</span>.props;</span><br></pre></td></tr></table></figure>
<ol>
<li>Now I can pass the state and actions as props to my components (aka. dumb components). In my example I passed it to the Recipelist component and AddForm component. Then I can use the actions and states in my components.</li>
</ol>
<figure class="highlight js"><table><tr><td class="gutter"><pre><span class="line">1</span><br><span class="line">2</span><br><span class="line">3</span><br><span class="line">4</span><br><span class="line">5</span><br><span class="line">6</span><br><span class="line">7</span><br><span class="line">8</span><br><span class="line">9</span><br><span class="line">10</span><br><span class="line">11</span><br><span class="line">12</span><br></pre></td><td class="code"><pre><span class="line"><span class="comment">//App.js</span></span><br><span class="line">  &lt;Grid&gt;</span><br><span class="line">    &lt;Header /&gt;</span><br><span class="line">    &lt;Recipelist</span><br><span class="line">      recipes=&#123;recipes&#125;</span><br><span class="line">      deleterecipe=&#123;actions.deleteRecipe&#125;</span><br><span class="line">      editrecipe=&#123;actions.editRecipe&#125;</span><br><span class="line">    /&gt;</span><br><span class="line">    &lt;AddForm</span><br><span class="line">      addrecipe=&#123;actions.addRecipe&#125;</span><br><span class="line">    /&gt;</span><br><span class="line">  &lt;<span class="regexp">/Grid&gt;</span></span><br></pre></td></tr></table></figure>
<h2 id="Conclusion"><a href="#Conclusion" class="headerlink" title="Conclusion"></a>Conclusion</h2><p>We successfully move our state to redux. As our app gets bigger having a central store management is imperative. This is not it. With redux install we can track our actions and state via Redux Dev tool. In the next blog post, I’ll share how to use the debugging tool and some extra tips.</p>
<h2 id="Links"><a href="#Links" class="headerlink" title="Links"></a>Links</h2><ul>
<li><a href="https://github.com/kuanhsuh/ReactJS-FCC_Recipe_Box" target="_blank" rel="noopener">My FCC Recipebox Github</a></li>
<li><a href="http://fcc-react-recipebox.surge.sh/" target="_blank" rel="noopener">My FCC Recipebox Demo</a></li>
<li><a href="http://redux.js.org/docs/basics/UsageWithReact.html" target="_blank" rel="noopener">Redux React Documentation</a></li>
</ul>
]]></content>
    
    <summary type="html">
    
      &lt;p&gt;&lt;img src=&quot;https://raw.githubusercontent.com/reactjs/redux/master/logo/logo-title-dark.png&quot; alt=&quot;Redux Logo&quot; title=&quot;Redux Logo&quot;&gt;&lt;/p&gt;
&lt;h2 i
    
    </summary>
    
    
      <category term="react" scheme="http://yoursite.com/tags/react/"/>
    
      <category term="redux" scheme="http://yoursite.com/tags/redux/"/>
    
  </entry>
  
  <entry>
    <title>What&#39;s Redux and how to use it? Redux Series I</title>
    <link href="http://yoursite.com/What-s-Redux-and-how-to-use-it.html"/>
    <id>http://yoursite.com/What-s-Redux-and-how-to-use-it.html</id>
    <published>2017-09-28T13:13:18.000Z</published>
    <updated>2017-10-07T00:50:18.000Z</updated>
    
    <content type="html"><![CDATA[<h2 id="Introduction"><a href="#Introduction" class="headerlink" title="Introduction"></a>Introduction</h2><p>Redux is a global state management object for your react app. It’s basic idea comes from the flux architecture. We Need to redux because as our react app gets bigger. It’s hard to manage our state. If two child component share the same state from parents. The child must pass the state back to parent and then to the other child component. To solve this problem, we need a global store.</p>
<p><img src="https://cdn.css-tricks.com/wp-content/uploads/2016/03/redux-article-3-03.svg" alt="React Child Component with and without Redux" title="React Child Component with and without Redux"></p>
<p>Now with redux, we just need to change the state in our redux and all the react component will automatically be updated.</p>
<h2 id="SO-How-do-we-use-it"><a href="#SO-How-do-we-use-it" class="headerlink" title="SO How do we use it."></a>SO How do we use it.</h2><p>I’ll use one of my demo app as in example. First we need to identify an action type. It is basically a string but we defined it as a variable. We do this for best practice so we don’t make typos.</p>
<figure class="highlight js"><table><tr><td class="gutter"><pre><span class="line">1</span><br><span class="line">2</span><br></pre></td><td class="code"><pre><span class="line"><span class="comment">//Action Type</span></span><br><span class="line"><span class="keyword">export</span> <span class="keyword">const</span> ADD_RECIPE = <span class="string">'ADD_RECIPE'</span>;</span><br></pre></td></tr></table></figure>
<p>Now we identify our action. Here we call our action types and our payload(data that we want to send to our state.)</p>
<figure class="highlight js"><table><tr><td class="gutter"><pre><span class="line">1</span><br><span class="line">2</span><br></pre></td><td class="code"><pre><span class="line"><span class="comment">// action.js</span></span><br><span class="line"><span class="keyword">export</span> <span class="keyword">const</span> addRecipe = <span class="function"><span class="params">recipe</span> =&gt;</span> (&#123; <span class="attr">type</span>: types.ADD_RECIPE, recipe &#125;)</span><br></pre></td></tr></table></figure>
<p>Next we pass the recipe to our reducer to add to our state. And our state is now updated!! yay!!</p>
<figure class="highlight js"><table><tr><td class="gutter"><pre><span class="line">1</span><br><span class="line">2</span><br><span class="line">3</span><br><span class="line">4</span><br><span class="line">5</span><br><span class="line">6</span><br><span class="line">7</span><br><span class="line">8</span><br><span class="line">9</span><br><span class="line">10</span><br><span class="line">11</span><br><span class="line">12</span><br><span class="line">13</span><br><span class="line">14</span><br><span class="line">15</span><br><span class="line">16</span><br><span class="line">17</span><br><span class="line">18</span><br><span class="line">19</span><br><span class="line">20</span><br><span class="line">21</span><br></pre></td><td class="code"><pre><span class="line"><span class="comment">//reducer_recipes.js</span></span><br><span class="line"><span class="keyword">const</span> initialState = [</span><br><span class="line">  &#123;<span class="attr">name</span>: <span class="string">'Sushi'</span>, <span class="attr">ingredients</span>: [<span class="string">'3 tablespoons rice vinegar'</span>, <span class="string">'4 sheets nori (dry seaweed)'</span>, <span class="string">'1/2 cucumber, sliced into thin strips'</span>]&#125;,</span><br><span class="line">  ...</span><br><span class="line">];</span><br><span class="line"></span><br><span class="line"><span class="keyword">export</span> <span class="keyword">default</span> <span class="function"><span class="keyword">function</span>(<span class="params">state = initialState, action</span>)</span>&#123;</span><br><span class="line">  <span class="keyword">switch</span> (action.type) &#123;</span><br><span class="line">    <span class="keyword">case</span> ADD_RECIPE:</span><br><span class="line">      <span class="keyword">return</span> [</span><br><span class="line">        ...state</span><br><span class="line">        ,</span><br><span class="line">        &#123;</span><br><span class="line">        name: action.recipe.name,</span><br><span class="line">        ingredients: action.recipe.ingredients</span><br><span class="line">        &#125;</span><br><span class="line">      ]</span><br><span class="line">    <span class="keyword">default</span>:</span><br><span class="line">      <span class="keyword">return</span> state</span><br><span class="line">  &#125;</span><br><span class="line">&#125;</span><br></pre></td></tr></table></figure>
<figure class="highlight js"><table><tr><td class="gutter"><pre><span class="line">1</span><br><span class="line">2</span><br><span class="line">3</span><br><span class="line">4</span><br><span class="line">5</span><br><span class="line">6</span><br><span class="line">7</span><br><span class="line">8</span><br><span class="line">9</span><br><span class="line">10</span><br><span class="line">11</span><br><span class="line">12</span><br><span class="line">13</span><br><span class="line">14</span><br><span class="line">15</span><br></pre></td><td class="code"><pre><span class="line"><span class="comment">// reducers/index.js</span></span><br><span class="line"><span class="comment">// Now we export our reducers.</span></span><br><span class="line"><span class="keyword">const</span> rootReducer = combineReducers(&#123;</span><br><span class="line">  recipes</span><br><span class="line">&#125;);</span><br><span class="line"></span><br><span class="line"><span class="keyword">export</span> <span class="keyword">default</span> rootReducer;</span><br><span class="line"><span class="comment">//index.js</span></span><br><span class="line"><span class="keyword">const</span> store = createStore(reducer);</span><br><span class="line">ReactDOM.render(</span><br><span class="line">  &lt;Provider store=&#123;store&#125;&gt;</span><br><span class="line">  &lt;App /&gt;</span><br><span class="line">  &lt;<span class="regexp">/Provider&gt;,</span></span><br><span class="line"><span class="regexp">  document.getElementById('root')</span></span><br><span class="line"><span class="regexp">);</span></span><br></pre></td></tr></table></figure>
<p>Here’s a diagram on how redux works. I also attach two examples with demo site that uses redux.</p>
<p><img src="https://camo.githubusercontent.com/9de527b9432cc9244dc600875b46b43311918b59/68747470733a2f2f73332e616d617a6f6e6177732e636f6d2f6d656469612d702e736c69642e65732f75706c6f6164732f3336343831322f696d616765732f323438343739302f415243482d5265647578322d657874656e6465642d7265616c2d6465636c657261746976652e676966" alt="Redux Flow chart" title="Redux Flow Chart"></p>
<p>This is it for redux. You can connect redux with jquery for plain javascript. Next I’ll talk about how to connect redux to our react component in the next blog post.</p>
<h2 id="Links"><a href="#Links" class="headerlink" title="Links"></a>Links</h2><ul>
<li><a href="https://github.com/kuanhsuh/netflix-clonev2" target="_blank" rel="noopener">My Netflix redux example</a></li>
<li><a href="https://github.com/kuanhsuh/ReactJS-FCC_Recipe_Box" target="_blank" rel="noopener">My FCC Recipebox example</a></li>
</ul>
]]></content>
    
    <summary type="html">
    
      &lt;h2 id=&quot;Introduction&quot;&gt;&lt;a href=&quot;#Introduction&quot; class=&quot;headerlink&quot; title=&quot;Introduction&quot;&gt;&lt;/a&gt;Introduction&lt;/h2&gt;&lt;p&gt;Redux is a global state manage
    
    </summary>
    
    
      <category term="react" scheme="http://yoursite.com/tags/react/"/>
    
      <category term="redux" scheme="http://yoursite.com/tags/redux/"/>
    
  </entry>
  
  <entry>
    <title>My first JS framework - Learning React</title>
    <link href="http://yoursite.com/My-first-JS-framework-React.html"/>
    <id>http://yoursite.com/My-first-JS-framework-React.html</id>
    <published>2017-09-16T14:21:39.000Z</published>
    <updated>2017-10-07T00:51:18.000Z</updated>
    
    <content type="html"><![CDATA[<p><img src="https://tctechcrunch2011.files.wordpress.com/2015/09/react-native.png?w=738" alt="React Logo" title="React Logo"></p>
<h2 id="Background"><a href="#Background" class="headerlink" title="Background"></a>Background</h2><p>I started learning React after I finished my freecodecamp FCC. It seems like the obvious choice for multiple reasons. It’s the biggest frontend framework. It has the most jobs available. It is backed by facebook, so it won’t go away any time soon.</p>
<p>I soon realize to learn react, I must learn webpack, babel, es6, blah blah blah. I found out I’m not the only one that who this problem. Luckily, facebook came out with create-react-app, so I don’t have to deal with configuration. (I feature I’ll learn the configuration later)</p>
<p>I’m going to share with you the few must knows about react.</p>
<h2 id="Must-knows"><a href="#Must-knows" class="headerlink" title="Must knows"></a>Must knows</h2><h3 id="Props"><a href="#Props" class="headerlink" title="Props"></a>Props</h3><p><img src="https://image.slidesharecdn.com/random-170808015058/95/29-8-638.jpg?cb=1502157181" alt="React props" title="React props example from React Maker"></p>
<p><img src="https://image.slidesharecdn.com/random-170808015058/95/29-10-638.jpg?cb=1502157181" alt="React props" title="React props example from React Maker 2"></p>
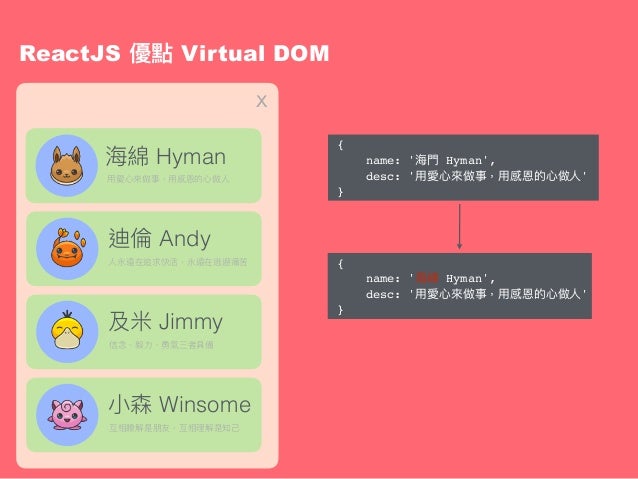
<p>Props are information that are passed between components. It is how components communicate. Because of this we can split our webpage into many components, and have one main component(which we call container) to get all the data. Then we can passdown the data to the following props.</p>
<p>In the above example, there is a user component and  we can pass props from the parents compoent to the User component(user, desc, and src). Then we can reuse the User component and the User component is completely independent. Note props can also be functions.</p>
<h3 id="State"><a href="#State" class="headerlink" title="State"></a>State</h3><p>State is an object that manages the information and on this component. State can store information, the status of the component. For example if we want a component to show or hode such as modal.</p>
<figure class="highlight jsx"><table><tr><td class="gutter"><pre><span class="line">1</span><br><span class="line">2</span><br><span class="line">3</span><br><span class="line">4</span><br><span class="line">5</span><br><span class="line">6</span><br><span class="line">7</span><br><span class="line">8</span><br><span class="line">9</span><br><span class="line">10</span><br><span class="line">11</span><br><span class="line">12</span><br><span class="line">13</span><br></pre></td><td class="code"><pre><span class="line"><span class="comment">// state is used to store state of component</span></span><br><span class="line"><span class="keyword">this</span>.state = &#123;</span><br><span class="line">  modal: <span class="literal">false</span></span><br><span class="line">&#125;</span><br><span class="line">toggle = <span class="function"><span class="params">()</span> =&gt;</span> &#123;</span><br><span class="line">    <span class="keyword">this</span>.setState(&#123;</span><br><span class="line">        modal: !modal,</span><br><span class="line">    &#125;);</span><br><span class="line">&#125;</span><br><span class="line">...</span><br><span class="line"><span class="comment">// modal = true，isOpen</span></span><br><span class="line">&lt;Modal isOpen=&#123;<span class="keyword">this</span>.state.modal&#125;&gt;</span><br><span class="line">&lt;<span class="regexp">/Modal&gt;</span></span><br></pre></td></tr></table></figure>
<figure class="highlight jsx"><table><tr><td class="gutter"><pre><span class="line">1</span><br><span class="line">2</span><br><span class="line">3</span><br><span class="line">4</span><br><span class="line">5</span><br><span class="line">6</span><br><span class="line">7</span><br><span class="line">8</span><br><span class="line">9</span><br></pre></td><td class="code"><pre><span class="line"></span><br><span class="line"><span class="comment">// state can be used to store data.</span></span><br><span class="line">state = &#123;</span><br><span class="line">    modal: <span class="literal">false</span>,</span><br><span class="line">    album: AlbumJson,</span><br><span class="line">    cart: [],</span><br><span class="line">&#125;</span><br><span class="line">...</span><br><span class="line">&lt;Button color=<span class="string">"primary"</span> onClick=&#123;<span class="keyword">this</span>.toggle&#125;&gt;Cart(&#123;<span class="keyword">this</span>.state.cart.length&#125;)&lt;<span class="regexp">/Button&gt;</span></span><br></pre></td></tr></table></figure>
<p>Another debugging technique is that I usually type console.log(‘state’, this.state) between return and render to track the state for debugging purpose.</p>
<h3 id="Component-life-cycle"><a href="#Component-life-cycle" class="headerlink" title="Component life cycle"></a>Component life cycle</h3><p><img src="https://github.com/kdchang/reactjs101/raw/master/Ch04/images/react-lifecycle.png" alt="Component Life Cycle" title="Component Life Cycle"><br>component life cycle is useful when we want to execute a function when the function state has changed. For example, if want to perform an ajax call before component mounted, we can use the componentWillMount() life cycle and then we can store the data in the state.</p>
<figure class="highlight jsx"><table><tr><td class="gutter"><pre><span class="line">1</span><br><span class="line">2</span><br><span class="line">3</span><br><span class="line">4</span><br><span class="line">5</span><br><span class="line">6</span><br><span class="line">7</span><br><span class="line">8</span><br><span class="line">9</span><br><span class="line">10</span><br><span class="line">11</span><br><span class="line">12</span><br><span class="line">13</span><br><span class="line">14</span><br><span class="line">15</span><br><span class="line">16</span><br></pre></td><td class="code"><pre><span class="line"><span class="keyword">import</span> React, &#123; Component &#125; <span class="keyword">from</span> <span class="string">'react'</span>;</span><br><span class="line"></span><br><span class="line"><span class="keyword">export</span> <span class="keyword">default</span> <span class="class"><span class="keyword">class</span> <span class="title">Home</span> <span class="keyword">extends</span> <span class="title">Component</span> </span>&#123;</span><br><span class="line"></span><br><span class="line">  componentWillMount()&#123;</span><br><span class="line">    <span class="comment">// execute api here</span></span><br><span class="line">  &#125;</span><br><span class="line"></span><br><span class="line">  render() &#123;</span><br><span class="line">    <span class="keyword">return</span> (</span><br><span class="line">      &lt;div id=<span class="string">"pageHome"</span>&gt;</span><br><span class="line">        hi <span class="keyword">this</span> is home page</span><br><span class="line">      &lt;<span class="regexp">/div&gt;</span></span><br><span class="line"><span class="regexp">    );</span></span><br><span class="line"><span class="regexp">  &#125;</span></span><br><span class="line"><span class="regexp">&#125;</span></span><br></pre></td></tr></table></figure>
<h2 id="Links"><a href="#Links" class="headerlink" title="Links"></a>Links</h2><ul>
<li><a href="https://medium.com/reactmaker/" target="_blank" rel="noopener">Medium React Maker</a></li>
<li><a href="https://facebook.github.io/react/" target="_blank" rel="noopener">Facebook React Documentation</a></li>
</ul>
]]></content>
    
    <summary type="html">
    
      &lt;p&gt;&lt;img src=&quot;https://tctechcrunch2011.files.wordpress.com/2015/09/react-native.png?w=738&quot; alt=&quot;React Logo&quot; title=&quot;React Logo&quot;&gt;&lt;/p&gt;
&lt;h2 id=&quot;B
    
    </summary>
    
    
      <category term="react" scheme="http://yoursite.com/tags/react/"/>
    
  </entry>
  
  <entry>
    <title>How to implement multi-language  with Vue-i18n </title>
    <link href="http://yoursite.com/How-to-implement-multi-language-with-Vue-i18n.html"/>
    <id>http://yoursite.com/How-to-implement-multi-language-with-Vue-i18n.html</id>
    <published>2017-09-16T02:59:14.000Z</published>
    <updated>2018-06-25T14:14:35.759Z</updated>
    
    <content type="html"><![CDATA[<h2 id="Introduction"><a href="#Introduction" class="headerlink" title="Introduction"></a>Introduction</h2><p>Recently I been ask to implement i18n into our company’s web app. The library we use is Vue-i18n. I’ll share with you how to implement this library with your app.</p>
<h2 id="Instruction"><a href="#Instruction" class="headerlink" title="Instruction"></a>Instruction</h2><h3 id="i18n-setup"><a href="#i18n-setup" class="headerlink" title="i18n setup"></a>i18n setup</h3><ul>
<li>Install the package</li>
</ul>
<figure class="highlight shell"><table><tr><td class="gutter"><pre><span class="line">1</span><br></pre></td><td class="code"><pre><span class="line">npm install vue-i18n --save</span><br></pre></td></tr></table></figure>
<ul>
<li>Create lang folder to store your json file and Vue-i18n setup</li>
</ul>
<figure class="highlight plain"><table><tr><td class="gutter"><pre><span class="line">1</span><br><span class="line">2</span><br><span class="line">3</span><br><span class="line">4</span><br><span class="line">5</span><br><span class="line">6</span><br><span class="line">7</span><br><span class="line">8</span><br><span class="line">9</span><br><span class="line">10</span><br><span class="line">11</span><br></pre></td><td class="code"><pre><span class="line">// Folder Structure</span><br><span class="line">src</span><br><span class="line">│</span><br><span class="line">└───lang</span><br><span class="line">    │   lang.js</span><br><span class="line">    │</span><br><span class="line">    └───subfolder1</span><br><span class="line">        │   en.json</span><br><span class="line">        │   cn.json</span><br><span class="line">        │   tw.json</span><br><span class="line">        │   es.json</span><br></pre></td></tr></table></figure>
<ul>
<li>Create a message and locale variable</li>
<li>locale variable stores the current locale that you wish to display</li>
<li>messages varaibles stores all the language package (en.json, cn.json)</li>
<li>Store messages and locale in your VueI18n instance</li>
</ul>
<figure class="highlight js"><table><tr><td class="gutter"><pre><span class="line">1</span><br><span class="line">2</span><br><span class="line">3</span><br><span class="line">4</span><br><span class="line">5</span><br><span class="line">6</span><br><span class="line">7</span><br><span class="line">8</span><br><span class="line">9</span><br><span class="line">10</span><br><span class="line">11</span><br><span class="line">12</span><br><span class="line">13</span><br><span class="line">14</span><br><span class="line">15</span><br><span class="line">16</span><br><span class="line">17</span><br><span class="line">18</span><br></pre></td><td class="code"><pre><span class="line">Vue.use(VueI18n)</span><br><span class="line"></span><br><span class="line"><span class="keyword">const</span> locale = <span class="string">'cn'</span></span><br><span class="line"></span><br><span class="line"><span class="keyword">const</span> messages = &#123;</span><br><span class="line">    cn: cn,</span><br><span class="line">    tw: tw,</span><br><span class="line">    en: en,</span><br><span class="line">    es: es,</span><br><span class="line">&#125;</span><br><span class="line"></span><br><span class="line"><span class="keyword">const</span> i18n = <span class="keyword">new</span> VueI18n(&#123;</span><br><span class="line">    <span class="comment">/** 默认值 */</span></span><br><span class="line">    locale,</span><br><span class="line">    messages</span><br><span class="line">&#125;)</span><br><span class="line"></span><br><span class="line"><span class="keyword">export</span> <span class="keyword">default</span> i18n</span><br></pre></td></tr></table></figure>
<h3 id="Vuex-Setup"><a href="#Vuex-Setup" class="headerlink" title="Vuex Setup"></a>Vuex Setup</h3><ul>
<li>In our main.js (where we handle all our imports), we want to export our Vue instance as a variable</li>
</ul>
<figure class="highlight js"><table><tr><td class="gutter"><pre><span class="line">1</span><br><span class="line">2</span><br><span class="line">3</span><br><span class="line">4</span><br><span class="line">5</span><br><span class="line">6</span><br><span class="line">7</span><br></pre></td><td class="code"><pre><span class="line"><span class="comment">// main.js</span></span><br><span class="line">  <span class="keyword">export</span> <span class="keyword">const</span> app = <span class="keyword">new</span> Vue(&#123;</span><br><span class="line">    el: <span class="string">'#app'</span>,</span><br><span class="line">    store,</span><br><span class="line">    i18n,</span><br><span class="line">    render: <span class="function"><span class="params">h</span> =&gt;</span> h(App)</span><br><span class="line">  &#125;)</span><br></pre></td></tr></table></figure>
<ul>
<li>Now we can import our Vue instance as app variable and use it in our vuex to access our i18n to change locale</li>
</ul>
<figure class="highlight js"><table><tr><td class="gutter"><pre><span class="line">1</span><br><span class="line">2</span><br><span class="line">3</span><br><span class="line">4</span><br><span class="line">5</span><br><span class="line">6</span><br><span class="line">7</span><br><span class="line">8</span><br><span class="line">9</span><br><span class="line">10</span><br><span class="line">11</span><br><span class="line">12</span><br><span class="line">13</span><br><span class="line">14</span><br></pre></td><td class="code"><pre><span class="line"><span class="comment">// mutation.js</span></span><br><span class="line"><span class="keyword">import</span> &#123;app&#125; <span class="keyword">from</span> <span class="string">'../main'</span></span><br><span class="line">...</span><br><span class="line"><span class="keyword">export</span> <span class="keyword">const</span> mutations = &#123;</span><br><span class="line">  [types.SET_LANG] (state, payload) &#123;</span><br><span class="line">    app.$i18n.locale = payload</span><br><span class="line">  &#125;</span><br><span class="line">&#125;</span><br><span class="line"></span><br><span class="line"><span class="keyword">export</span> <span class="keyword">const</span> actions = &#123;</span><br><span class="line">  setLang(&#123;commit&#125;, payload) &#123;</span><br><span class="line">    commit(types.SET_LANG, payload)</span><br><span class="line">  &#125;</span><br><span class="line">&#125;</span><br></pre></td></tr></table></figure>
<ul>
<li>In our Vue component, we can map our vuex action.</li>
<li>Finally, all we need to do is to connect our directive with :click directive</li>
</ul>
<figure class="highlight html"><table><tr><td class="gutter"><pre><span class="line">1</span><br></pre></td><td class="code"><pre><span class="line"><span class="tag">&lt;<span class="name">button</span> @<span class="attr">click</span>=<span class="string">"setLang('cn')"</span>&gt;</span>cn<span class="tag">&lt;/<span class="name">button</span>&gt;</span></span><br></pre></td></tr></table></figure>
<figure class="highlight js"><table><tr><td class="gutter"><pre><span class="line">1</span><br><span class="line">2</span><br><span class="line">3</span><br><span class="line">4</span><br><span class="line">5</span><br></pre></td><td class="code"><pre><span class="line">methods: &#123;</span><br><span class="line">  setLang: <span class="function"><span class="keyword">function</span>(<span class="params">lang</span>)</span>&#123;</span><br><span class="line">    <span class="keyword">this</span>.$store.dispatch(<span class="string">'setLang'</span>, lang)</span><br><span class="line">  &#125;</span><br><span class="line">&#125;</span><br></pre></td></tr></table></figure>
<h3 id="Debug-Technique"><a href="#Debug-Technique" class="headerlink" title="Debug Technique"></a>Debug Technique</h3><ul>
<li>Set vue instance and vuex store as window variable, so we can ccess your i18n in your chrome</li>
</ul>
<figure class="highlight js"><table><tr><td class="gutter"><pre><span class="line">1</span><br><span class="line">2</span><br><span class="line">3</span><br></pre></td><td class="code"><pre><span class="line"><span class="comment">//main.js</span></span><br><span class="line"><span class="built_in">window</span>[<span class="string">'vue'</span>] = app</span><br><span class="line"><span class="built_in">window</span>.store = store</span><br></pre></td></tr></table></figure>

<p><strong><em>Edit 2017.10.07</em></strong><br>How to use lazy loading (or dynamic locale ) in vue i18n.<br>You want use lazy loading becuase you don’t want to load all the language pack in the initial load. It will make your bundle size bigger and slow down your app.</p>
<p>Here’s how you use it in your app.</p>
<figure class="highlight js"><table><tr><td class="gutter"><pre><span class="line">1</span><br><span class="line">2</span><br><span class="line">3</span><br><span class="line">4</span><br><span class="line">5</span><br><span class="line">6</span><br><span class="line">7</span><br><span class="line">8</span><br><span class="line">9</span><br><span class="line">10</span><br><span class="line">11</span><br><span class="line">12</span><br><span class="line">13</span><br><span class="line">14</span><br><span class="line">15</span><br><span class="line">16</span><br><span class="line">17</span><br></pre></td><td class="code"><pre><span class="line"><span class="keyword">async</span> setLangNew(&#123;commit&#125;, payload)&#123;</span><br><span class="line">  <span class="keyword">if</span> (payload <span class="keyword">in</span> app.$i18n.messages) &#123;</span><br><span class="line">    commit(types.SET_LANG, payload)</span><br><span class="line">  &#125; <span class="keyword">else</span> &#123;</span><br><span class="line">    <span class="keyword">try</span> &#123;</span><br><span class="line">      <span class="comment">// you can use fetch or import which ever you want.</span></span><br><span class="line">      <span class="comment">// Just make sure your webpack support import syntax</span></span><br><span class="line">      <span class="comment">// const res = await axios.get(`./src/lang/$&#123;payload&#125;.json`)</span></span><br><span class="line">      <span class="keyword">const</span> res = <span class="keyword">await</span> <span class="keyword">import</span>(<span class="string">`./src/lang/locale/<span class="subst">$&#123;payload&#125;</span>.json`</span>)</span><br><span class="line">      app.$i18n.setLocaleMessage(payload, res.data)</span><br><span class="line">      commit(types.SET_LANG, payload)</span><br><span class="line">    &#125;</span><br><span class="line">    <span class="keyword">catch</span>(e) &#123;</span><br><span class="line">      <span class="built_in">console</span>.log(e)</span><br><span class="line">    &#125;</span><br><span class="line">  &#125;</span><br><span class="line">&#125;</span><br></pre></td></tr></table></figure>
<h2 id="Recommendations"><a href="#Recommendations" class="headerlink" title="Recommendations"></a>Recommendations</h2><p>If you are interested in learning Vue or Advanced Javascript, I strongly recommend these 2 courses.👊</p>
<p>🏷 Vue  2 The Complete Guide: <a href="http://bit.ly/udemyvue" target="_blank" rel="noopener">http://bit.ly/udemyvue</a></p>
<p>🏷 Modern JavaScript From The Beginning: <a href="http://bit.ly/modernjavascript" target="_blank" rel="noopener">http://bit.ly/modernjavascript</a></p>
<p>👍USE THE BOTTOM LINK TO GET ADDIONIONAL DISCOUNT ON YOUR COURSES👍<br><a href="http://bit.ly/udemy10tw" target="_blank" rel="noopener">http://bit.ly/udemy10tw</a><br><a href="http://bit.ly/udemy10limited" target="_blank" rel="noopener">http://bit.ly/udemy10limited</a></p>
<h2 id="Links"><a href="#Links" class="headerlink" title="Links"></a>Links</h2><ul>
<li><a href="https://github.com/kuanhsuh/vue-i18n-sandbox" target="_blank" rel="noopener">Source Code</a></li>
<li><a href="https://github.com/kazupon/vue-i18n" target="_blank" rel="noopener">Vue i18n Library</a></li>
</ul>
]]></content>
    
    <summary type="html">
    
      &lt;h2 id=&quot;Introduction&quot;&gt;&lt;a href=&quot;#Introduction&quot; class=&quot;headerlink&quot; title=&quot;Introduction&quot;&gt;&lt;/a&gt;Introduction&lt;/h2&gt;&lt;p&gt;Recently I been ask to impleme
    
    </summary>
    
    
      <category term="Vue" scheme="http://yoursite.com/tags/Vue/"/>
    
  </entry>
  
  <entry>
    <title>Javascript - Algorithm</title>
    <link href="http://yoursite.com/Javascript-Algorithm.html"/>
    <id>http://yoursite.com/Javascript-Algorithm.html</id>
    <published>2017-09-08T21:06:36.000Z</published>
    <updated>2018-01-01T01:47:48.000Z</updated>
    
    <content type="html"><![CDATA[<div class="video-container"><iframe src="//www.youtube.com/embed/6hfOvs8pY1k" frameborder="0" allowfullscreen></iframe></div>
<h2 id="Introduction"><a href="#Introduction" class="headerlink" title="Introduction"></a>Introduction</h2><p>Algorithem is a step by step process to how to solve a program. Algorithm is important because it can influence the speed and efficency of our program. As our program size grow or our users grow, we don’t want slow functions affect our user experience.</p>
<p>Here a sneak peak of some algorithm methods that I’ll go over in further blog series.</p>
<ul>
<li>Binary Search</li>
<li>Fibonacci &amp; Memoized Fibonacci</li>
<li>Merge Sort &amp; bubble sort</li>
<li>Caesar Cipher</li>
<li>Sieve of Eratosthenes</li>
</ul>
<h2 id="Big-O"><a href="#Big-O" class="headerlink" title="Big O"></a>Big O</h2><p>Lastly I want to talk about Big O notation (or Big O for short).  Big O notation is used to classify algorithms according to how their running time or space requirements grow as the input size grows. (source, Wiki). Basically Big O will tell us how scalable a function is?</p>
<p>There are 4 types of Big O and here are some examples</p>
<p><img src="https://i.imgur.com/b1q2NZr.png" alt="Big O Chart"></p>
<h3 id="Big-O-O-1-Constant-Runtime"><a href="#Big-O-O-1-Constant-Runtime" class="headerlink" title="Big O - O (1) - Constant Runtime"></a>Big O - O (1) - Constant Runtime</h3><figure class="highlight javascript"><table><tr><td class="gutter"><pre><span class="line">1</span><br><span class="line">2</span><br><span class="line">3</span><br><span class="line">4</span><br><span class="line">5</span><br><span class="line">6</span><br><span class="line">7</span><br><span class="line">8</span><br><span class="line">9</span><br></pre></td><td class="code"><pre><span class="line"></span><br><span class="line"><span class="comment">// Big O - O (1) - Constant Runtime</span></span><br><span class="line"><span class="function"><span class="keyword">function</span> <span class="title">log</span>(<span class="params">array</span>) </span>&#123;</span><br><span class="line">  <span class="built_in">console</span>.log(array[<span class="number">0</span>])</span><br><span class="line">  <span class="built_in">console</span>.log(array[<span class="number">1</span>])</span><br><span class="line">&#125;</span><br><span class="line"></span><br><span class="line">log ([<span class="number">1</span>,<span class="number">2</span>,<span class="number">3</span>,<span class="number">4</span>])</span><br><span class="line">log ([<span class="number">1</span>,<span class="number">2</span>,<span class="number">3</span>,<span class="number">4</span>,<span class="number">5</span>,<span class="number">6</span>,<span class="number">7</span>,<span class="number">8</span>])</span><br></pre></td></tr></table></figure>
<p>The above example is a constant run time example or sometimes refer as O(1). This means as input size increases on X-axis, the time it takes to run never changes. (Refer to chart Above)</p>
<h3 id="Big-O-O-n-Linear-Runtime"><a href="#Big-O-O-n-Linear-Runtime" class="headerlink" title="Big O - O (n) - Linear Runtime"></a>Big O - O (n) - Linear Runtime</h3><figure class="highlight javascript"><table><tr><td class="gutter"><pre><span class="line">1</span><br><span class="line">2</span><br><span class="line">3</span><br><span class="line">4</span><br><span class="line">5</span><br><span class="line">6</span><br><span class="line">7</span><br><span class="line">8</span><br><span class="line">9</span><br><span class="line">10</span><br></pre></td><td class="code"><pre><span class="line"></span><br><span class="line"><span class="comment">// Big O - O (n) - Linear Runtime</span></span><br><span class="line"><span class="function"><span class="keyword">function</span> <span class="title">logAll</span>(<span class="params">array</span>) </span>&#123;</span><br><span class="line">  <span class="keyword">for</span> (<span class="keyword">var</span> i = <span class="number">0</span>, i &lt; array.length; i++) &#123;</span><br><span class="line">    <span class="built_in">console</span>.log(array[i])</span><br><span class="line">  &#125;</span><br><span class="line">&#125;</span><br><span class="line"></span><br><span class="line">logAll ([<span class="number">1</span>,<span class="number">2</span>,<span class="number">3</span>,<span class="number">4</span>])</span><br><span class="line">logAll ([<span class="number">1</span>,<span class="number">2</span>,<span class="number">3</span>,<span class="number">4</span>,<span class="number">5</span>,<span class="number">6</span>,<span class="number">7</span>,<span class="number">8</span>])</span><br></pre></td></tr></table></figure>
<p>The above example is a linear runtime example or sometimes refer as O(n). This means as input size increases on X-axis, the time will take to run increase linearly.(Refer to chart Above)</p>
<h3 id="Big-O-O-n-2-Exponential-Runtime"><a href="#Big-O-O-n-2-Exponential-Runtime" class="headerlink" title="Big O - O (n^2) - Exponential Runtime"></a>Big O - O (n^2) - Exponential Runtime</h3><figure class="highlight javascript"><table><tr><td class="gutter"><pre><span class="line">1</span><br><span class="line">2</span><br><span class="line">3</span><br><span class="line">4</span><br><span class="line">5</span><br><span class="line">6</span><br><span class="line">7</span><br><span class="line">8</span><br><span class="line">9</span><br><span class="line">10</span><br><span class="line">11</span><br><span class="line">12</span><br><span class="line">13</span><br></pre></td><td class="code"><pre><span class="line"></span><br><span class="line"><span class="comment">// Big O - O (n^2) - Exponential Runtime</span></span><br><span class="line"><span class="function"><span class="keyword">function</span> <span class="title">addAndLog</span>(<span class="params">array</span>) </span>&#123;</span><br><span class="line">  <span class="keyword">for</span> (<span class="keyword">var</span> i = <span class="number">0</span>, i &lt; array.length; i++) &#123;</span><br><span class="line">    <span class="keyword">for</span> (<span class="keyword">var</span> j = <span class="number">0</span>, j &lt; array.length; j++)&#123;</span><br><span class="line">      <span class="built_in">console</span>.log(array[i] + array[j])</span><br><span class="line">    &#125;</span><br><span class="line">  &#125;</span><br><span class="line">&#125;</span><br><span class="line"></span><br><span class="line">addAndLog ([<span class="string">'A'</span>,<span class="string">'B'</span>,<span class="string">'C'</span>]) <span class="comment">// 9 pairs output</span></span><br><span class="line">addAndLog ([<span class="string">'A'</span>,<span class="string">'B'</span>,<span class="string">'C'</span>, <span class="string">'D'</span>]) <span class="comment">// 16 pairs output</span></span><br><span class="line">addAndLog ([<span class="string">'A'</span>,<span class="string">'B'</span>,<span class="string">'C'</span>, <span class="string">'D'</span>, <span class="string">'E'</span>]) <span class="comment">// 25 pairs output</span></span><br></pre></td></tr></table></figure>
<p>The above example is a exponential runtime example or sometimes refer as O(n^2). This means as input size increases on X-axis, the time will take to run increase exponentially.(Refer to chart Above)</p>
<p>We want to stay away from these functions because they are slow and inefficent. They will slow down your application when user grows.</p>
<h3 id="Big-O-O-log-n-Logarithmic-Runtime"><a href="#Big-O-O-log-n-Logarithmic-Runtime" class="headerlink" title="Big O - O (log n) - Logarithmic Runtime"></a>Big O - O (log n) - Logarithmic Runtime</h3><figure class="highlight javascript"><table><tr><td class="gutter"><pre><span class="line">1</span><br><span class="line">2</span><br><span class="line">3</span><br><span class="line">4</span><br><span class="line">5</span><br><span class="line">6</span><br><span class="line">7</span><br><span class="line">8</span><br><span class="line">9</span><br><span class="line">10</span><br><span class="line">11</span><br><span class="line">12</span><br><span class="line">13</span><br><span class="line">14</span><br><span class="line">15</span><br><span class="line">16</span><br><span class="line">17</span><br><span class="line">18</span><br><span class="line">19</span><br><span class="line">20</span><br><span class="line">21</span><br></pre></td><td class="code"><pre><span class="line"></span><br><span class="line"><span class="comment">// Big O - O (log n) - Logarithmic Runtime</span></span><br><span class="line"><span class="function"><span class="keyword">function</span> <span class="title">binarySearch</span>(<span class="params">array, key</span>) </span>&#123;</span><br><span class="line">  <span class="keyword">var</span> low = <span class="number">0</span>;</span><br><span class="line">  <span class="keyword">var</span> high = array.lengh - <span class="number">1</span>;</span><br><span class="line">  <span class="keyword">var</span> mid;</span><br><span class="line">  <span class="keyword">var</span> element;</span><br><span class="line"></span><br><span class="line">  <span class="keyword">while</span> (low &lt;= high) &#123;</span><br><span class="line">    mid = <span class="built_in">Math</span>.floor((low + high)/ <span class="number">2</span>, <span class="number">10</span>)</span><br><span class="line">    element = array[mid]</span><br><span class="line">    <span class="keyword">if</span> (element &lt; key) &#123;</span><br><span class="line">      low = mid + <span class="number">1</span>;</span><br><span class="line">    &#125; <span class="keyword">else</span> <span class="keyword">if</span> (element &gt; key) &#123;</span><br><span class="line">      high = mid - <span class="number">1</span>;</span><br><span class="line">    &#125; <span class="keyword">else</span> &#123;</span><br><span class="line">      <span class="keyword">return</span> mid;</span><br><span class="line">    &#125;</span><br><span class="line">  &#125;</span><br><span class="line">  <span class="keyword">return</span> <span class="number">-1</span></span><br><span class="line">&#125;</span><br></pre></td></tr></table></figure>
<p>Binary search takes a list (array) and a key. The array must be sorted in some way (numerically or alphabetically). This method is fast and as the input size grow our execution time will only grow logarithmicly(refer to chart above).</p>
<p>An example of this is looking for a word in dictionary. If we want to look for the word, “House”, we flip to the middle of the dictionary and see how close we are to letter “H”, and we ignore the 2nd half of the dictionary. We keep repeating this process until we are at letter “H”.</p>
<p>A search through 4,000 elements will take 12 operations, and 8000 elements will take 13 operations.</p>
<h3 id="Resources"><a href="#Resources" class="headerlink" title="Resources"></a>Resources</h3><ul>
<li><a href="https://en.wikipedia.org/wiki/Algorithm" target="_blank" rel="noopener">Wiki Algorithm</a></li>
<li><a href="https://en.wikipedia.org/wiki/Big_O_notation" target="_blank" rel="noopener">Wiki Big O Notation</a></li>
<li><a href="http://bigocheatsheet.com/" target="_blank" rel="noopener">Big O CheatSheet</a></li>
</ul>
]]></content>
    
    <summary type="html">
    
      &lt;div class=&quot;video-container&quot;&gt;&lt;iframe src=&quot;//www.youtube.com/embed/6hfOvs8pY1k&quot; frameborder=&quot;0&quot; allowfullscreen&gt;&lt;/iframe&gt;&lt;/div&gt;
&lt;h2 id=&quot;Intro
    
    </summary>
    
    
      <category term="Javascript" scheme="http://yoursite.com/tags/Javascript/"/>
    
  </entry>
  
  <entry>
    <title>Thoughts on Bootstrap 4</title>
    <link href="http://yoursite.com/Thoughts-on-Bootstrap-4.html"/>
    <id>http://yoursite.com/Thoughts-on-Bootstrap-4.html</id>
    <published>2017-09-02T21:50:29.000Z</published>
    <updated>2017-09-03T06:53:26.000Z</updated>
    
    <content type="html"><![CDATA[<p><img src="https://getbootstrap.com/assets/img/bootstrap-stack.png" alt="Bootstrap v4" title="Bootstrap v4"></p>
<h2 id="Introduction"><a href="#Introduction" class="headerlink" title="Introduction"></a>Introduction</h2><p>Bootstrap has been my favorite css framework because of it’s large amount of components and its well css structure. Bootstrap is currently the largest CSS framework which means it also has the most resources. Bootstrap has definately help me with my css workflow. I usually let bootstrap take care of the major layouts and RWD. After the layout is confirmed, I’ll dig in to each individual block and customize each block with my own css.</p>
<p>Recently Bootstrap 4 beta has been released. It was in alpha for A LONG TIME (~ 1 year). Since beta is released, I decided to use it with my current project. Here are some of my thoughts on this.</p>
<h2 id="Big-Upgrades"><a href="#Big-Upgrades" class="headerlink" title="Big Upgrades"></a>Big Upgrades</h2><h3 id="flexbox"><a href="#flexbox" class="headerlink" title="flexbox"></a>flexbox</h3><p>The biggest upgrade in V4 is that it uses flexbox. Flexbox is one of newer features in css. It was released in 2016 and is quickly popularized. It’s purpose is to replace float for CSS layout. Flexbox offers an easier and powerful way of designing css layout. We are given more tools and flexability in bootstrap layouts especially in navigation, grid, and spacing.</p>
<p>We can customize that a specific margin to applied only in a certain width. For example, by applying .mt-4 .mt-sm-0, we can margin-top 4rem but when window width is larger than small we get margin-top zero. Before to accomplish this in bootstrap 3, we need to write custom media queries.</p>
<p>The downside of this major upgrade is that bootstrap 4 is not supported by ie8 or ie9. So if you still need to support those browsers, you can use bootstrap 3.</p>
<h3 id="Others"><a href="#Others" class="headerlink" title="Others"></a>Others</h3><ul>
<li>Other upgrades such as 2 more grid size xl and xs.</li>
<li>Bootstrap uses sass instead of less. To customize bootstrap we can just edit the variable.scss</li>
<li>We get more utilities in many components, grid,  typography.</li>
<li>Bootstrap also drop glyicons to reduce size.</li>
</ul>
<h2 id="Links"><a href="#Links" class="headerlink" title="Links"></a>Links</h2><ul>
<li><a href="https://getbootstrap.com/docs/4.0/migration/" target="_blank" rel="noopener">Bootstrap v3-v4 migration</a></li>
</ul>
]]></content>
    
    <summary type="html">
    
      &lt;p&gt;&lt;img src=&quot;https://getbootstrap.com/assets/img/bootstrap-stack.png&quot; alt=&quot;Bootstrap v4&quot; title=&quot;Bootstrap v4&quot;&gt;&lt;/p&gt;
&lt;h2 id=&quot;Introduction&quot;&gt;&lt;a 
    
    </summary>
    
    
      <category term="css" scheme="http://yoursite.com/tags/css/"/>
    
  </entry>
  
  <entry>
    <title>My Sketch Workflow</title>
    <link href="http://yoursite.com/My-Sketch-Workflow.html"/>
    <id>http://yoursite.com/My-Sketch-Workflow.html</id>
    <published>2017-08-26T13:56:46.000Z</published>
    <updated>2018-01-01T01:50:38.000Z</updated>
    
    <content type="html"><![CDATA[<h2 id="Pre-work"><a href="#Pre-work" class="headerlink" title="Pre-work"></a>Pre-work</h2><h3 id="File-Structure"><a href="#File-Structure" class="headerlink" title="File Structure"></a>File Structure</h3>
<p><img src="https://i.imgur.com/IWVGcHB.png" alt="File Structure"><br>The file structure that I take is to have a _assets, _exports, and design folder. The _assets folder is where I keep my dummy text, logo, images and etc. _exports is where I exports my design and images. Lastly the design folder is where I have my sketch file (usually only one).</p>
<h3 id="Style-Sheet"><a href="#Style-Sheet" class="headerlink" title="Style Sheet"></a>Style Sheet</h3>
<p><img src="https://i.imgur.com/Viu9X1Y.png" alt="StyleSheet"></p>
<p>Style sheet is an artboard where I keep my color palettes and font. The style sheet I use is call One Day Frontend Design Framework. (Link below) However, I did not use the full feature of the stylesheet.<br>After settleing your stylesheet, set up your text styles and layer styles. This will save you time when you are in design phase.</p>
<h2 id="WireFrame"><a href="#WireFrame" class="headerlink" title="WireFrame"></a>WireFrame</h2><p><img src="https://i.imgur.com/Jo9nWGW.png" alt="Wireframes"></p>
<p>I use some simple shapes to draw out my block wireframes basially to see what a basic section will look like and to have the elements in my design.</p>
<h2 id="Design"><a href="#Design" class="headerlink" title="Design"></a>Design</h2><p><img src="https://i.imgur.com/tUfdTpZ.jpg" alt="Final Design"></p>
<p>Finally into design, the hardest part. After doing the preworks, you should have a rough idea of what the final design will look like. First I would put all the things I know together in place, like the text and images. Keep doing this for the other sections. Don’t worry about the little details. There’s no such thing as perfect design. We want to get the first draft out ASAP.</p>
<p>After first draft is out. I’ll look through each indivual section to see if there’s any thing I can improve. Remember every design has to align with your website’s purpose. Then I’ll ask random to see the design and get feedback.</p>
<h2 id="Prototype"><a href="#Prototype" class="headerlink" title="Prototype"></a>Prototype</h2><p>Lastly, this is optional but you can build a prototype with <a href="https://marvelapp.com" target="_blank" rel="noopener">marvel</a> or <a href="https://www.invisionapp.com/" target="_blank" rel="noopener">invision</a>. Prototype provides a more realistic user experience for users.</p>
<h2 id="Links"><a href="#Links" class="headerlink" title="Links"></a>Links</h2><ul>
<li><a href="https://www.sketchappsources.com/free-source/2374-oneday-frontend-design-framework-sketch-freebie-resource.html" target="_blank" rel="noopener">One Day Frontend Design Framework</a></li>
</ul>
]]></content>
    
    <summary type="html">
    
      &lt;h2 id=&quot;Pre-work&quot;&gt;&lt;a href=&quot;#Pre-work&quot; class=&quot;headerlink&quot; title=&quot;Pre-work&quot;&gt;&lt;/a&gt;Pre-work&lt;/h2&gt;&lt;h3 id=&quot;File-Structure&quot;&gt;&lt;a href=&quot;#File-Structure&quot;
    
    </summary>
    
    
      <category term="sketch" scheme="http://yoursite.com/tags/sketch/"/>
    
      <category term="UI" scheme="http://yoursite.com/tags/UI/"/>
    
  </entry>
  
  <entry>
    <title>Web-Optimization - Semantic HTML</title>
    <link href="http://yoursite.com/Web-Optimization-semantic-HTML.html"/>
    <id>http://yoursite.com/Web-Optimization-semantic-HTML.html</id>
    <published>2017-08-05T10:48:33.000Z</published>
    <updated>2017-08-12T23:00:36.000Z</updated>
    
    <content type="html"><![CDATA[<h2 id="Background"><a href="#Background" class="headerlink" title="Background"></a>Background</h2><p>Semantic HTML is a feature in HTML. It exist back in HTML such as form, img, and tables. In HTML5, more semantic tags are added, for example header, footer, and nav. There are many benefits to for this. This added more structure to our html page. In the following, I’ll discuss the benefits of semantic HTML.</p>
<h2 id="Benefits"><a href="#Benefits" class="headerlink" title="Benefits"></a>Benefits</h2><ol>
<li><p>SEO<br>Better structure allows search engines to identify which block is more important.</p>
</li>
<li><p>Download Speed</p>
</li>
<li><p>Maintainence.<br>Better structure means better maintainence.</p>
</li>
<li><p>Better for disability browsing</p>
</li>
</ol>
<h2 id="How-to-implement"><a href="#How-to-implement" class="headerlink" title="How to implement"></a>How to implement</h2><p><img src="http://html5doctor.com/downloads/h5d-sectioning-flowchart.png" alt="HTML 5" title="HTML 5 semantic flow chart"></p>
<ol>
<li><p>Replace divs with section, header, nav, footer or others.</p>
</li>
<li><p>Use the above diagram to decide which html tag to use.</p>
</li>
</ol>
<h2 id="Links"><a href="#Links" class="headerlink" title="Links"></a>Links</h2><ul>
<li><a href="http://html5doctor.com/lets-talk-about-semantics/" target="_blank" rel="noopener">HTML5 Semantics</a></li>
</ul>
]]></content>
    
    <summary type="html">
    
      &lt;h2 id=&quot;Background&quot;&gt;&lt;a href=&quot;#Background&quot; class=&quot;headerlink&quot; title=&quot;Background&quot;&gt;&lt;/a&gt;Background&lt;/h2&gt;&lt;p&gt;Semantic HTML is a feature in HTML. It
    
    </summary>
    
    
      <category term="Web Optimization" scheme="http://yoursite.com/tags/Web-Optimization/"/>
    
  </entry>
  
  <entry>
    <title>Web Optimization - Image</title>
    <link href="http://yoursite.com/Web-Optimization-Image.html"/>
    <id>http://yoursite.com/Web-Optimization-Image.html</id>
    <published>2017-08-02T22:31:42.000Z</published>
    <updated>2017-08-05T10:52:48.000Z</updated>
    
    <content type="html"><![CDATA[<h2 id="Background"><a href="#Background" class="headerlink" title="Background"></a>Background</h2><p>Image optimization is very important for your web app. It accounts for more than 50% of the loading time. 47% of users expect a webpage to load in under 2 seconds, and 40% will abandon a page that takes more than 3 seconds to load.</p>
<p>You can also optimize your image tag and image name for better SEO performance. Here’s a infograph of how loading time affects user experience.</p>
<p><img src="https://blog.kissmetrics.com/wp-content/uploads/2011/04/loading-time-lrg.jpg" alt="Kissmetrics Loading Time infographic" title="Kissmetrics Loading Time infogrpahic"></p>
<h2 id="Tips"><a href="#Tips" class="headerlink" title="Tips"></a>Tips</h2><ol>
<li>Change name to a descriptive name rather than a generic name such as DCMIMAGE10.jpg</li>
<li>Use alt tag for better SEO</li>
<li>Use the right dimension (simple tip 2x the mobile display dimension to get retina result)</li>
<li><p>know which file type to use png vs jpg<br><img src="https://cdn.shopify.com/s/files/1/0070/7032/files/book-image-quality-example.jpg" alt="PNG vs GIF vs JPG" title="PNG vs GIF vs JPG"></p>
</li>
<li><p>Use compression tools such as <a href="http://optimizilla.com/" target="_blank" rel="noopener">http://optimizilla.com/</a> and ImageOptim <a href="https://imageoptim.com/mac" target="_blank" rel="noopener">link</a> to remove unnesscessary meta tags and also compress image size for web without losing much quality.</p>
</li>
</ol>
<p>PRO TIP: As a general rule of thumb, I like my product photos to be a maximum 80-150 KB, and for large homepage hero images to be a maximum of 250-350 KB</p>
<h2 id="Links"><a href="#Links" class="headerlink" title="Links"></a>Links</h2><ul>
<li><a href="https://shopify.barrelny.com/how-to-resize-your-logo-image-for-retina/" target="_blank" rel="noopener">Resize for retina result</a></li>
<li><a href="https://developers.google.com/web/fundamentals/performance/optimizing-content-efficiency/image-optimization" target="_blank" rel="noopener">Google Developer - Image Optimization</a></li>
</ul>
]]></content>
    
    <summary type="html">
    
      &lt;h2 id=&quot;Background&quot;&gt;&lt;a href=&quot;#Background&quot; class=&quot;headerlink&quot; title=&quot;Background&quot;&gt;&lt;/a&gt;Background&lt;/h2&gt;&lt;p&gt;Image optimization is very important f
    
    </summary>
    
    
      <category term="Web Optimization" scheme="http://yoursite.com/tags/Web-Optimization/"/>
    
  </entry>
  
  <entry>
    <title>CSS - Ways to Center Your Divs</title>
    <link href="http://yoursite.com/CSS-Ways-to-Center-Your-Divs.html"/>
    <id>http://yoursite.com/CSS-Ways-to-Center-Your-Divs.html</id>
    <published>2017-07-27T22:35:36.000Z</published>
    <updated>2017-11-11T00:03:56.000Z</updated>
    
    <content type="html"><![CDATA[<h2 id="Background"><a href="#Background" class="headerlink" title="Background"></a>Background</h2><p>Centering your div blocks both horizontally and vertically is a tricky tasky. Today I’m going to show you four ways to do it. So let’s do eeetttt!</p>
<h2 id="1-Transform-Technique"><a href="#1-Transform-Technique" class="headerlink" title="1. Transform Technique"></a>1. Transform Technique</h2><p>Make the parent div position relative so the child position will based on parent’s position. Next to move it top and left 50% and transform back 50% in both x &amp; y-axis.</p>
<figure class="highlight css"><table><tr><td class="gutter"><pre><span class="line">1</span><br><span class="line">2</span><br><span class="line">3</span><br><span class="line">4</span><br><span class="line">5</span><br><span class="line">6</span><br><span class="line">7</span><br><span class="line">8</span><br><span class="line">9</span><br><span class="line">10</span><br><span class="line">11</span><br><span class="line">12</span><br><span class="line">13</span><br><span class="line">14</span><br><span class="line">15</span><br></pre></td><td class="code"><pre><span class="line">// Transform</span><br><span class="line"><span class="selector-class">.hero-image1</span> &#123;</span><br><span class="line">  <span class="attribute">background</span>: <span class="number">#3498db</span>;</span><br><span class="line">  <span class="attribute">height</span>: <span class="number">100vh</span>;</span><br><span class="line">  <span class="attribute">position</span>: relative;</span><br><span class="line">&#125;</span><br><span class="line"></span><br><span class="line"><span class="selector-class">.hero-text1</span> &#123;</span><br><span class="line">  <span class="attribute">text-align</span>: center;</span><br><span class="line">  <span class="attribute">position</span>: absolute;</span><br><span class="line">  <span class="attribute">top</span>: <span class="number">50%</span>;</span><br><span class="line">  <span class="attribute">left</span>: <span class="number">50%</span>;</span><br><span class="line">  <span class="attribute">color</span>: white;</span><br><span class="line">  <span class="attribute">transform</span>: <span class="built_in">translate</span>(-50%, -50%);</span><br><span class="line">&#125;</span><br></pre></td></tr></table></figure>
<h2 id="2-FlexBox"><a href="#2-FlexBox" class="headerlink" title="2. FlexBox"></a>2. FlexBox</h2><p>Flexbox is the easiest way to center a div. It’s a newer feature in css, the unforunately thing is some old browsers don’t support it. (sign…) Basically you set display to flex and both align-items and justify-content to center.</p>
<figure class="highlight css"><table><tr><td class="gutter"><pre><span class="line">1</span><br><span class="line">2</span><br><span class="line">3</span><br><span class="line">4</span><br><span class="line">5</span><br><span class="line">6</span><br><span class="line">7</span><br><span class="line">8</span><br><span class="line">9</span><br><span class="line">10</span><br><span class="line">11</span><br><span class="line">12</span><br><span class="line">13</span><br></pre></td><td class="code"><pre><span class="line"></span><br><span class="line"><span class="selector-class">.hero-image2</span> &#123;</span><br><span class="line">  <span class="attribute">background</span>: <span class="number">#34495e</span>;</span><br><span class="line">  <span class="attribute">height</span>: <span class="number">100vh</span>;</span><br><span class="line">  <span class="attribute">display</span>: flex;</span><br><span class="line">  <span class="attribute">align-items</span>: center;</span><br><span class="line">  <span class="attribute">justify-content</span>: center;</span><br><span class="line">&#125;</span><br><span class="line"></span><br><span class="line"><span class="selector-class">.hero-text2</span> &#123;</span><br><span class="line">  <span class="attribute">text-align</span>: center;</span><br><span class="line">  <span class="attribute">color</span>: white;</span><br><span class="line">&#125;</span><br></pre></td></tr></table></figure>
<h2 id="3-Table-Cell"><a href="#3-Table-Cell" class="headerlink" title="3. Table Cell"></a>3. Table Cell</h2><p>Table cell method is an old school way of doing this. This method was popular when web layout is organized by table, which is still popular with email templates.</p>
<p>Basically you set parent div with display table and set child display to table-cell. Also set the child with text-align center and vertical align middle.</p>
<figure class="highlight css"><table><tr><td class="gutter"><pre><span class="line">1</span><br><span class="line">2</span><br><span class="line">3</span><br><span class="line">4</span><br><span class="line">5</span><br><span class="line">6</span><br><span class="line">7</span><br><span class="line">8</span><br><span class="line">9</span><br><span class="line">10</span><br><span class="line">11</span><br><span class="line">12</span><br><span class="line">13</span><br><span class="line">14</span><br></pre></td><td class="code"><pre><span class="line">//Table Cell</span><br><span class="line"><span class="selector-class">.hero-image3</span> &#123;</span><br><span class="line">  <span class="attribute">background</span>: <span class="number">#e74c3c</span>;</span><br><span class="line">  <span class="attribute">height</span>: <span class="number">100vh</span>;</span><br><span class="line">  <span class="attribute">width</span>: <span class="number">100%</span>;</span><br><span class="line">  <span class="attribute">display</span>: table;</span><br><span class="line">&#125;</span><br><span class="line"></span><br><span class="line"><span class="selector-class">.hero-text3</span> &#123;</span><br><span class="line">  <span class="attribute">text-align</span>: center;</span><br><span class="line">  <span class="attribute">display</span>: table-cell;</span><br><span class="line">  <span class="attribute">vertical-align</span>: middle;</span><br><span class="line">  <span class="attribute">color</span>: white;</span><br><span class="line">&#125;</span><br></pre></td></tr></table></figure>
<h2 id="4-Fixed-width-element"><a href="#4-Fixed-width-element" class="headerlink" title="4. Fixed width element"></a>4. Fixed width element</h2><p>This technique will only work with fixed width element. This will also work with older browsers.</p>
<figure class="highlight css"><table><tr><td class="gutter"><pre><span class="line">1</span><br><span class="line">2</span><br><span class="line">3</span><br><span class="line">4</span><br><span class="line">5</span><br><span class="line">6</span><br><span class="line">7</span><br><span class="line">8</span><br><span class="line">9</span><br><span class="line">10</span><br><span class="line">11</span><br><span class="line">12</span><br><span class="line">13</span><br><span class="line">14</span><br><span class="line">15</span><br></pre></td><td class="code"><pre><span class="line"><span class="selector-class">.parent</span> &#123;</span><br><span class="line">  <span class="attribute">position</span>: relative;</span><br><span class="line">&#125;</span><br><span class="line"></span><br><span class="line"><span class="selector-class">.child</span> &#123;</span><br><span class="line">  <span class="attribute">width</span>: <span class="number">300px</span>;</span><br><span class="line">  <span class="attribute">height</span>: <span class="number">100px</span>;</span><br><span class="line">  <span class="attribute">padding</span>: <span class="number">20px</span>;</span><br><span class="line"></span><br><span class="line">  <span class="attribute">position</span>: absolute;</span><br><span class="line">  <span class="attribute">top</span>: <span class="number">50%</span>;</span><br><span class="line">  <span class="attribute">left</span>: <span class="number">50%</span>;</span><br><span class="line"></span><br><span class="line">  <span class="attribute">margin</span>: -<span class="number">70px</span> <span class="number">0</span> <span class="number">0</span> -<span class="number">170px</span>;</span><br><span class="line">&#125;</span><br></pre></td></tr></table></figure>
<h2 id="Links"><a href="#Links" class="headerlink" title="Links"></a>Links</h2><ul>
<li><a href="https://codepen.io/dannyhuang/pen/OjPNOa" target="_blank" rel="noopener">Codepen Demo</a></li>
<li><a href="https://css-tricks.com/centering-css-complete-guide/" target="_blank" rel="noopener">CSS Tricks</a></li>
</ul>
]]></content>
    
    <summary type="html">
    
      &lt;h2 id=&quot;Background&quot;&gt;&lt;a href=&quot;#Background&quot; class=&quot;headerlink&quot; title=&quot;Background&quot;&gt;&lt;/a&gt;Background&lt;/h2&gt;&lt;p&gt;Centering your div blocks both horizon
    
    </summary>
    
    
      <category term="css" scheme="http://yoursite.com/tags/css/"/>
    
  </entry>
  
  <entry>
    <title>CSS-2 ways to build parallax effect</title>
    <link href="http://yoursite.com/CSS-2-ways-to-build-parallax-effect.html"/>
    <id>http://yoursite.com/CSS-2-ways-to-build-parallax-effect.html</id>
    <published>2017-07-23T22:25:33.000Z</published>
    <updated>2017-11-11T00:03:54.000Z</updated>
    
    <content type="html"><![CDATA[<h2 id="What-is-parallax"><a href="#What-is-parallax" class="headerlink" title="What is parallax"></a>What is parallax</h2><p>Parallax is an effect where the background layer or image in this case, is moved at a different speed than the front layer while scrolling.</p>
<p>Parallax design is a popular technique in modern webdesign. There are two approaches to this effect: CSS and JS. Both are really easy. So here we go</p>
<h2 id="CSS-Approach"><a href="#CSS-Approach" class="headerlink" title="CSS Approach"></a>CSS Approach</h2><p>For your background image, you need to make the background-attachment property fixed. This will set whether the background image is fixed or scrolls with the rest of the page.</p>
<figure class="highlight html"><table><tr><td class="gutter"><pre><span class="line">1</span><br><span class="line">2</span><br><span class="line">3</span><br><span class="line">4</span><br><span class="line">5</span><br><span class="line">6</span><br><span class="line">7</span><br><span class="line">8</span><br><span class="line">9</span><br><span class="line">10</span><br><span class="line">11</span><br><span class="line">12</span><br><span class="line">13</span><br><span class="line">14</span><br><span class="line">15</span><br><span class="line">16</span><br><span class="line">17</span><br><span class="line">18</span><br></pre></td><td class="code"><pre><span class="line"><span class="tag">&lt;<span class="name">style</span>&gt;</span><span class="undefined"></span></span><br><span class="line"><span class="undefined">.parallax &#123;</span></span><br><span class="line"><span class="undefined">    /* The image used */</span></span><br><span class="line"><span class="undefined">    background-image: url("img_parallax.jpg");</span></span><br><span class="line"><span class="undefined"></span></span><br><span class="line"><span class="undefined">    /* Set a specific height */</span></span><br><span class="line"><span class="undefined">    height: 500px;</span></span><br><span class="line"><span class="undefined"></span></span><br><span class="line"><span class="undefined">    /* Create the parallax scrolling effect */</span></span><br><span class="line"><span class="undefined">    background-attachment: fixed;</span></span><br><span class="line"><span class="undefined">    background-position: center;</span></span><br><span class="line"><span class="undefined">    background-repeat: no-repeat;</span></span><br><span class="line"><span class="undefined">    background-size: cover;</span></span><br><span class="line"><span class="undefined">&#125;</span></span><br><span class="line"><span class="undefined"></span><span class="tag">&lt;/<span class="name">style</span>&gt;</span></span><br><span class="line"></span><br><span class="line"><span class="comment">&lt;!-- Container element --&gt;</span></span><br><span class="line"><span class="tag">&lt;<span class="name">div</span> <span class="attr">class</span>=<span class="string">"parallax"</span>&gt;</span><span class="tag">&lt;/<span class="name">div</span>&gt;</span></span><br></pre></td></tr></table></figure>
<p>Here’s a demo of how the site will work. <a href="https://github.com/kuanhsuh/css_parallax" target="_blank" rel="noopener">My Github Demo</a></p>
<h1 id="JS-Approach"><a href="#JS-Approach" class="headerlink" title="JS Approach"></a>JS Approach</h1><p>In your html section add data-type and data-speed attribute. The speed will adjust the speed of how the background move.</p>
<p>Markup<br><figure class="highlight html"><table><tr><td class="gutter"><pre><span class="line">1</span><br><span class="line">2</span><br><span class="line">3</span><br><span class="line">4</span><br><span class="line">5</span><br><span class="line">6</span><br><span class="line">7</span><br></pre></td><td class="code"><pre><span class="line"><span class="tag">&lt;<span class="name">section</span> <span class="attr">id</span>=<span class="string">"home"</span> <span class="attr">data-type</span>=<span class="string">"background"</span> <span class="attr">data-speed</span>=<span class="string">"10"</span>&gt;</span></span><br><span class="line"><span class="tag">&lt;<span class="name">article</span>&gt;</span>I am absolute positioned<span class="tag">&lt;/<span class="name">article</span>&gt;</span></span><br><span class="line"><span class="tag">&lt;/<span class="name">section</span>&gt;</span></span><br><span class="line"></span><br><span class="line"><span class="tag">&lt;<span class="name">section</span> <span class="attr">id</span>=<span class="string">"about"</span> <span class="attr">data-type</span>=<span class="string">"background"</span> <span class="attr">data-speed</span>=<span class="string">"10"</span>&gt;</span></span><br><span class="line"><span class="tag">&lt;<span class="name">article</span>&gt;</span>Simple Parallax Scroll<span class="tag">&lt;/<span class="name">article</span>&gt;</span></span><br><span class="line"><span class="tag">&lt;/<span class="name">section</span>&gt;</span></span><br></pre></td></tr></table></figure></p>
<figure class="highlight css"><table><tr><td class="gutter"><pre><span class="line">1</span><br><span class="line">2</span><br><span class="line">3</span><br><span class="line">4</span><br><span class="line">5</span><br><span class="line">6</span><br><span class="line">7</span><br><span class="line">8</span><br><span class="line">9</span><br><span class="line">10</span><br><span class="line">11</span><br><span class="line">12</span><br><span class="line">13</span><br><span class="line">14</span><br><span class="line">15</span><br><span class="line">16</span><br><span class="line">17</span><br><span class="line">18</span><br><span class="line">19</span><br><span class="line">20</span><br><span class="line">21</span><br><span class="line">22</span><br><span class="line">23</span><br><span class="line">24</span><br><span class="line">25</span><br><span class="line">26</span><br><span class="line">27</span><br><span class="line">28</span><br><span class="line">29</span><br><span class="line">30</span><br><span class="line">31</span><br><span class="line">32</span><br><span class="line">33</span><br><span class="line">34</span><br><span class="line">35</span><br></pre></td><td class="code"><pre><span class="line"><span class="selector-id">#home</span> &#123;</span><br><span class="line">  <span class="attribute">background</span>: <span class="built_in">url</span>(home-bg.jpg) <span class="number">50%</span> <span class="number">0</span> repeat fixed; <span class="attribute">min-height</span>: <span class="number">1000px</span>;</span><br><span class="line">  <span class="attribute">height</span>: <span class="number">1000px</span>;</span><br><span class="line">  <span class="attribute">margin</span>: <span class="number">0</span> auto;</span><br><span class="line">  <span class="attribute">width</span>: <span class="number">100%</span>;</span><br><span class="line">  <span class="attribute">max-width</span>: <span class="number">1920px</span>;</span><br><span class="line">  <span class="attribute">position</span>: relative;</span><br><span class="line">&#125;</span><br><span class="line"></span><br><span class="line"><span class="selector-id">#home</span> <span class="selector-tag">article</span> &#123;</span><br><span class="line">  <span class="attribute">height</span>: <span class="number">458px</span>;</span><br><span class="line">  <span class="attribute">position</span>: absolute;</span><br><span class="line">  <span class="attribute">text-align</span>: center;</span><br><span class="line">  <span class="attribute">top</span>: <span class="number">150px</span>;</span><br><span class="line">  <span class="attribute">width</span>: <span class="number">100%</span>;</span><br><span class="line">&#125;</span><br><span class="line"></span><br><span class="line"><span class="selector-id">#about</span> &#123;</span><br><span class="line">  <span class="attribute">background</span>: <span class="built_in">url</span>(about-bg.jpg) <span class="number">50%</span> <span class="number">0</span> repeat fixed; <span class="attribute">min-height</span>: <span class="number">1000px</span>;</span><br><span class="line">  <span class="attribute">height</span>: <span class="number">1000px</span>;</span><br><span class="line">  <span class="attribute">margin</span>: <span class="number">0</span> auto;</span><br><span class="line">  <span class="attribute">width</span>: <span class="number">100%</span>;</span><br><span class="line">  <span class="attribute">max-width</span>: <span class="number">1920px</span>;</span><br><span class="line">  <span class="attribute">position</span>: relative;</span><br><span class="line">  <span class="attribute">-webkit-box-shadow</span>: <span class="number">0</span> <span class="number">0</span> <span class="number">50px</span> <span class="built_in">rgba</span>(0,0,0,0.8);</span><br><span class="line">  <span class="attribute">box-shadow</span>: <span class="number">0</span> <span class="number">0</span> <span class="number">50px</span> <span class="built_in">rgba</span>(0,0,0,0.8);</span><br><span class="line">&#125;</span><br><span class="line"></span><br><span class="line"><span class="selector-id">#about</span> <span class="selector-tag">article</span> &#123;</span><br><span class="line">  <span class="attribute">height</span>: <span class="number">458px</span>;</span><br><span class="line">  <span class="attribute">position</span>: absolute;</span><br><span class="line">  <span class="attribute">text-align</span>: center;</span><br><span class="line">  <span class="attribute">top</span>: <span class="number">150px</span>;</span><br><span class="line">  <span class="attribute">width</span>: <span class="number">100%</span>;</span><br><span class="line">&#125;</span><br></pre></td></tr></table></figure>
<figure class="highlight javascript"><table><tr><td class="gutter"><pre><span class="line">1</span><br><span class="line">2</span><br><span class="line">3</span><br><span class="line">4</span><br><span class="line">5</span><br><span class="line">6</span><br><span class="line">7</span><br><span class="line">8</span><br><span class="line">9</span><br><span class="line">10</span><br><span class="line">11</span><br><span class="line">12</span><br><span class="line">13</span><br><span class="line">14</span><br><span class="line">15</span><br></pre></td><td class="code"><pre><span class="line">$(<span class="built_in">document</span>).ready(<span class="function"><span class="keyword">function</span>(<span class="params"></span>)</span>&#123;</span><br><span class="line">    $(<span class="string">'section[data-type="background"]'</span>).each(<span class="function"><span class="keyword">function</span>(<span class="params"></span>)</span>&#123;</span><br><span class="line">        <span class="keyword">var</span> $bgobj = $(<span class="keyword">this</span>); <span class="comment">// assigning the object</span></span><br><span class="line"></span><br><span class="line">        $(<span class="built_in">window</span>).scroll(<span class="function"><span class="keyword">function</span>(<span class="params"></span>) </span>&#123;</span><br><span class="line">            <span class="keyword">var</span> yPos = -($<span class="built_in">window</span>.scrollTop() / $bgobj.data(<span class="string">'speed'</span>));</span><br><span class="line"></span><br><span class="line">            <span class="comment">// Put together our final background position</span></span><br><span class="line">            <span class="keyword">var</span> coords = <span class="string">'50% '</span>+ yPos + <span class="string">'px'</span>;</span><br><span class="line"></span><br><span class="line">            <span class="comment">// Move the background</span></span><br><span class="line">            $bgobj.css(&#123; <span class="attr">backgroundPosition</span>: coords &#125;);</span><br><span class="line">        &#125;);</span><br><span class="line">    &#125;);</span><br><span class="line">&#125;);</span><br></pre></td></tr></table></figure>
<p>The concept of this code is illusrated in this image.<br><img src="https://cdn.tutsplus.com/net/uploads/legacy/2138_SimpleParallax/images/2.jpg" alt="Alt text"></p>
<h2 id="Links"><a href="#Links" class="headerlink" title="Links"></a>Links</h2><ul>
<li><a href="https://github.com/kuanhsuh/css_parallax" target="_blank" rel="noopener">My Github Repo</a></li>
<li><a href="https://code.tutsplus.com/tutorials/a-simple-parallax-scrolling-technique--net-27641" target="_blank" rel="noopener">Tutsplus Parallax Technique</a></li>
<li><a href="https://www.w3schools.com/cssref/pr_background-attachment.asp" target="_blank" rel="noopener">w3school background attachmend</a></li>
<li><a href="https://www.w3schools.com/howto/howto_css_parallax.asp" target="_blank" rel="noopener">w3school parallax</a></li>
</ul>
]]></content>
    
    <summary type="html">
    
      &lt;h2 id=&quot;What-is-parallax&quot;&gt;&lt;a href=&quot;#What-is-parallax&quot; class=&quot;headerlink&quot; title=&quot;What is parallax&quot;&gt;&lt;/a&gt;What is parallax&lt;/h2&gt;&lt;p&gt;Parallax is an
    
    </summary>
    
    
      <category term="css" scheme="http://yoursite.com/tags/css/"/>
    
  </entry>
  
  <entry>
    <title>NPM command cheatsheet</title>
    <link href="http://yoursite.com/Node-NPM-command-cheatsheet.html"/>
    <id>http://yoursite.com/Node-NPM-command-cheatsheet.html</id>
    <published>2017-07-15T07:38:36.000Z</published>
    <updated>2017-08-05T10:52:12.000Z</updated>
    
    <content type="html"><![CDATA[<h2 id="Basic-Commands"><a href="#Basic-Commands" class="headerlink" title="Basic Commands"></a>Basic Commands</h2><figure class="highlight bash"><table><tr><td class="gutter"><pre><span class="line">1</span><br><span class="line">2</span><br><span class="line">3</span><br><span class="line">4</span><br><span class="line">5</span><br><span class="line">6</span><br><span class="line">7</span><br><span class="line">8</span><br><span class="line">9</span><br><span class="line">10</span><br><span class="line">11</span><br><span class="line">12</span><br><span class="line">13</span><br><span class="line">14</span><br><span class="line">15</span><br><span class="line">16</span><br><span class="line">17</span><br><span class="line">18</span><br></pre></td><td class="code"><pre><span class="line">npm -v</span><br><span class="line">npm init <span class="comment"># create package.json &amp; add -y is yes to all requirements</span></span><br><span class="line">npm install <span class="comment"># install all packages in package.json</span></span><br><span class="line">npm install &lt;package&gt; <span class="comment"># install in package but not written in package.json</span></span><br><span class="line">npm install &lt;package&gt; --save-dev <span class="comment"># install in modules only in develop dependencies</span></span><br><span class="line">npm install &lt;package&gt;  --save <span class="comment"># install in modules in dependencies</span></span><br><span class="line">npm install &lt;package&gt;@&lt;version&gt; <span class="comment"># install specific version of package</span></span><br><span class="line"></span><br><span class="line">npm cache clean <span class="comment"># clear npm cache</span></span><br><span class="line"></span><br><span class="line">npm ls -g <span class="comment"># list all modules installed globally</span></span><br><span class="line">npm ls <span class="comment">#  list all modules locally</span></span><br><span class="line">npm list --depth 0 <span class="comment"># list all npm modules with depth 0</span></span><br><span class="line"></span><br><span class="line">npm show &lt;package&gt; <span class="comment"># show versions, maintainers</span></span><br><span class="line">npm outdated <span class="comment"># show all outdated modules</span></span><br><span class="line"></span><br><span class="line">npm prune <span class="comment">#removes "extraneous" packages. Extraneous packages are packages that are not listed on the parent package's dependencies list.</span></span><br></pre></td></tr></table></figure>
<h2 id="Range-Syntax"><a href="#Range-Syntax" class="headerlink" title="Range Syntax"></a>Range Syntax</h2><ol>
<li>caret (^)</li>
</ol>
<p>Allows changes that do not modify the left-most non-zero digit in the [major, minor, patch] tuple. In other words, this allows patch and minor updates for versions 1.0.0 and above, patch updates for versions 0.X &gt;=0.1.0, and no updates for versions 0.0.X.</p>
<p>“express”: “^4.15.3” means it can upgrade to version 4.99.0. Basically anything before 5.0.0</p>
<h2 id="Update-a-package"><a href="#Update-a-package" class="headerlink" title="Update a package"></a>Update a package</h2><ol>
<li><p>First find out your outdated packages by typing npm outdated</p>
</li>
<li><p>Then update the package or packages that you want manually as npm update –save package_name</p>
</li>
</ol>
<h2 id="Links"><a href="#Links" class="headerlink" title="Links"></a>Links</h2><ul>
<li><a href="https://github.com/npm/node-semver#ranges" target="_blank" rel="noopener">npm ranges</a></li>
<li><a href="https://www.youtube.com/watch?v=N0M1ATiCqvM" target="_blank" rel="noopener">npm prune</a></li>
</ul>
]]></content>
    
    <summary type="html">
    
      &lt;h2 id=&quot;Basic-Commands&quot;&gt;&lt;a href=&quot;#Basic-Commands&quot; class=&quot;headerlink&quot; title=&quot;Basic Commands&quot;&gt;&lt;/a&gt;Basic Commands&lt;/h2&gt;&lt;figure class=&quot;highlight 
    
    </summary>
    
    
      <category term="nodeJS" scheme="http://yoursite.com/tags/nodeJS/"/>
    
  </entry>
  
  <entry>
    <title>Node-Hide environemnt variables in your app</title>
    <link href="http://yoursite.com/Node-Hide-environemnt-variables-in-your-app.html"/>
    <id>http://yoursite.com/Node-Hide-environemnt-variables-in-your-app.html</id>
    <published>2017-07-08T22:13:30.000Z</published>
    <updated>2018-01-01T01:53:06.000Z</updated>
    
    <content type="html"><![CDATA[<h2 id="Introduction"><a href="#Introduction" class="headerlink" title="Introduction"></a>Introduction</h2><p>This is a question that I been struggle for a long time. However, I final figure it out. There are two ways that I recommend doing this using dotenv package or setting it manually.</p>
<h2 id="dotenv-package"><a href="#dotenv-package" class="headerlink" title="dotenv package"></a>dotenv package</h2><p>Here’s my example repo: <a href="https://github.com/kuanhsuh/node_hideglobalvar_demo" target="_blank" rel="noopener">dotenv repo</a></p>
<ol>
<li>First install dotenv</li>
</ol>
<figure class="highlight bash"><table><tr><td class="gutter"><pre><span class="line">1</span><br></pre></td><td class="code"><pre><span class="line">npm install dotenv --save-dev</span><br></pre></td></tr></table></figure>
<p>Create .env file</p>
<figure class="highlight javascript"><table><tr><td class="gutter"><pre><span class="line">1</span><br></pre></td><td class="code"><pre><span class="line">ABC_KEY = <span class="number">1234</span>qwer</span><br></pre></td></tr></table></figure>
<figure class="highlight javascript"><table><tr><td class="gutter"><pre><span class="line">1</span><br><span class="line">2</span><br><span class="line">3</span><br></pre></td><td class="code"><pre><span class="line"><span class="comment">// in server/index.js</span></span><br><span class="line"><span class="built_in">require</span>(<span class="string">'dotenv'</span>).config()</span><br><span class="line"><span class="built_in">console</span>.log(process.env.ABC_KEY)</span><br></pre></td></tr></table></figure>
<p>Remember in your .gitignore file to ignore .env file.</p>
<p><img src="https://i.imgur.com/HiC2Rs4.png" alt="Screenshot 3"></p>
<h2 id="Set-process-env-variable-in-terminal"><a href="#Set-process-env-variable-in-terminal" class="headerlink" title="Set process.env variable in terminal"></a>Set process.env variable in terminal</h2><p>Second way is to directly set your variable in your terminal and access it in your node.</p>
<figure class="highlight bash"><table><tr><td class="gutter"><pre><span class="line">1</span><br><span class="line">2</span><br><span class="line">3</span><br><span class="line">4</span><br></pre></td><td class="code"><pre><span class="line"><span class="comment"># type this in your terminal</span></span><br><span class="line"><span class="built_in">export</span> ABC_KEY=1234qwer <span class="comment"># no space and no quotation</span></span><br><span class="line"><span class="comment"># for window replace export for set</span></span><br><span class="line"><span class="built_in">unset</span> ABC_KEY <span class="comment"># unset variable</span></span><br></pre></td></tr></table></figure>
<p><img src="https://i.imgur.com/2Ey1CIb.png" alt="Hide Var"><br><img src="https://i.imgur.com/VfplNpO.png" alt="Hide Var 2"></p>
<p>Now you can access the variables in your node app by using process.env.ABC_KEY</p>
<h2 id="Links"><a href="#Links" class="headerlink" title="Links"></a>Links</h2><ul>
<li><a href="https://www.youtube.com/watch?v=zDup0I2VGmk" target="_blank" rel="noopener">DevCoffee tutorial</a></li>
<li><a href="https://github.com/kuanhsuh/node_hideglobalvar_demo" target="_blank" rel="noopener">dotenv repo</a></li>
</ul>
]]></content>
    
    <summary type="html">
    
      &lt;h2 id=&quot;Introduction&quot;&gt;&lt;a href=&quot;#Introduction&quot; class=&quot;headerlink&quot; title=&quot;Introduction&quot;&gt;&lt;/a&gt;Introduction&lt;/h2&gt;&lt;p&gt;This is a question that I been
    
    </summary>
    
    
      <category term="nodeJS" scheme="http://yoursite.com/tags/nodeJS/"/>
    
  </entry>
  
  <entry>
    <title>Git 202 - Squash Multiple Commits, Edit Last Commit, Git reset</title>
    <link href="http://yoursite.com/Git-202-Squash-Multiple-Commits-Edit-Last-Commit-Git-reset.html"/>
    <id>http://yoursite.com/Git-202-Squash-Multiple-Commits-Edit-Last-Commit-Git-reset.html</id>
    <published>2017-07-06T21:45:24.000Z</published>
    <updated>2017-07-08T22:11:44.000Z</updated>
    
    <content type="html"><![CDATA[<p>Here we will go over some more advanced git scenarios.</p>
<h2 id="Squah-Multiple-Commits"><a href="#Squah-Multiple-Commits" class="headerlink" title="Squah Multiple Commits"></a>Squah Multiple Commits</h2><ol>
<li><p>Let’s say we have multiple commits and we want to squash them. We use rebase to the first commit. The rebase screen will come up.</p>
<figure class="highlight bash"><table><tr><td class="gutter"><pre><span class="line">1</span><br><span class="line">2</span><br><span class="line">3</span><br></pre></td><td class="code"><pre><span class="line">b1 <span class="comment"># commit 1</span></span><br><span class="line">b2 <span class="comment"># commit 2</span></span><br><span class="line">git rebase -i 49687a0a646954afdf3f4dae1f914ea793341ea2 (Commit 1 version number)</span><br></pre></td></tr></table></figure>
</li>
<li><p>After rebase command we enter editor interface where we can edit the commits. Basically you need to choose one to squash and choose pick for the rest of the commits.</p>
<figure class="highlight bash"><table><tr><td class="gutter"><pre><span class="line">1</span><br><span class="line">2</span><br><span class="line">3</span><br><span class="line">4</span><br><span class="line">5</span><br><span class="line">6</span><br><span class="line">7</span><br><span class="line">8</span><br><span class="line">9</span><br><span class="line">10</span><br><span class="line">11</span><br><span class="line">12</span><br><span class="line">13</span><br><span class="line">14</span><br><span class="line">15</span><br><span class="line">16</span><br></pre></td><td class="code"><pre><span class="line">pick 033beb4 b1</span><br><span class="line">pick d426a8a b2</span><br><span class="line"></span><br><span class="line"><span class="comment"># Rebase 49687a0..d426a8a onto 49687a0</span></span><br><span class="line"><span class="comment">#</span></span><br><span class="line"><span class="comment"># Commands:</span></span><br><span class="line"><span class="comment">#  p, pick = use commit</span></span><br><span class="line"><span class="comment">#  r, reword = use commit, but edit the commit message</span></span><br><span class="line"><span class="comment">#  e, edit = use commit, but stop for amending</span></span><br><span class="line"><span class="comment">#  s, squash = use commit, but meld into previous commit</span></span><br><span class="line"><span class="comment">#  f, fixup = like "squash", but discard this commit's log message</span></span><br><span class="line"><span class="comment">#  x, exec = run command (the rest of the line) using shell</span></span><br><span class="line"><span class="comment">#</span></span><br><span class="line"><span class="comment"># If you remove a line here THAT COMMIT WILL BE LOST.</span></span><br><span class="line"><span class="comment"># However, if you remove everything, the rebase will be aborted.</span></span><br><span class="line"><span class="comment">#</span></span><br></pre></td></tr></table></figure>
</li>
<li><p>Next you need to enter a new commit message</p>
<figure class="highlight bash"><table><tr><td class="gutter"><pre><span class="line">1</span><br><span class="line">2</span><br><span class="line">3</span><br><span class="line">4</span><br><span class="line">5</span><br><span class="line">6</span><br><span class="line">7</span><br><span class="line">8</span><br><span class="line">9</span><br><span class="line">10</span><br><span class="line">11</span><br><span class="line">12</span><br><span class="line">13</span><br><span class="line">14</span><br><span class="line">15</span><br><span class="line">16</span><br><span class="line">17</span><br></pre></td><td class="code"><pre><span class="line">b</span><br><span class="line"><span class="comment"># This is a combination of 2 commits.</span></span><br><span class="line"><span class="comment"># The first commit's message is:</span></span><br><span class="line"><span class="comment"># b1</span></span><br><span class="line"><span class="comment">#</span></span><br><span class="line"><span class="comment"># This is the 2nd commit message:</span></span><br><span class="line"><span class="comment">#</span></span><br><span class="line"><span class="comment"># b2</span></span><br><span class="line"><span class="comment">#</span></span><br><span class="line"><span class="comment"># Please enter the commit message for your changes. Lines starting</span></span><br><span class="line"><span class="comment"># with '#' will be ignored, and an empty message aborts the commit.</span></span><br><span class="line"><span class="comment"># Not currently on any branch.</span></span><br><span class="line"><span class="comment"># Changes to be committed:</span></span><br><span class="line"><span class="comment">#   (use "git reset HEAD &lt;file&gt;..." to unstage)</span></span><br><span class="line"><span class="comment">#</span></span><br><span class="line"><span class="comment">#       modified:   a.txt</span></span><br><span class="line"><span class="comment">#</span></span><br></pre></td></tr></table></figure>
</li>
<li><p>You can check git log for update</p>
</li>
</ol>
<h2 id="Edit-last-Comment"><a href="#Edit-last-Comment" class="headerlink" title="Edit last Comment"></a>Edit last Comment</h2><ol>
<li>You use the amend command. Ammend command go back to the previous commit and edit it.</li>
<li><p>Another way is revert, which creates a new commit (does not interfere previous commit) but reverts status to previous commit.</p>
<figure class="highlight bash"><table><tr><td class="gutter"><pre><span class="line">1</span><br><span class="line">2</span><br></pre></td><td class="code"><pre><span class="line">git commit --amend -m <span class="string">"New commit message"</span></span><br><span class="line">git revert &lt;version number&gt;</span><br></pre></td></tr></table></figure>
</li>
</ol>
<h2 id="Git-Reset"><a href="#Git-Reset" class="headerlink" title="Git Reset"></a>Git Reset</h2><p>Here are some commands when you want to return to previous commit or situation before merge.</p>
<figure class="highlight bash"><table><tr><td class="gutter"><pre><span class="line">1</span><br><span class="line">2</span><br><span class="line">3</span><br><span class="line">4</span><br><span class="line">5</span><br><span class="line">6</span><br></pre></td><td class="code"><pre><span class="line"><span class="comment"># return to previous commit</span></span><br><span class="line">git reset HEAD^ --hard</span><br><span class="line"><span class="comment"># return to previous commit or cancel merge when enter conflict</span></span><br><span class="line">git reset --hard</span><br><span class="line"><span class="comment"># after merge return to before merge</span></span><br><span class="line">git reset --hard ORIG_HEAD</span><br></pre></td></tr></table></figure>
<h2 id="Links"><a href="#Links" class="headerlink" title="Links"></a>Links</h2><ul>
<li><a href="http://zerodie.github.io/blog/2012/01/19/git-rebase-i/" target="_blank" rel="noopener">Zerodie Github</a></li>
<li><a href="http://blog.gogojimmy.net/2012/02/29/git-scenario/" target="_blank" rel="noopener">gogojimmy</a></li>
</ul>
]]></content>
    
    <summary type="html">
    
      &lt;p&gt;Here we will go over some more advanced git scenarios.&lt;/p&gt;
&lt;h2 id=&quot;Squah-Multiple-Commits&quot;&gt;&lt;a href=&quot;#Squah-Multiple-Commits&quot; class=&quot;heade
    
    </summary>
    
    
      <category term="git" scheme="http://yoursite.com/tags/git/"/>
    
  </entry>
  
</feed>